Who is this article for?
This article is for practices that use the Interac payment automation of Colib and receive their Interac notifications in Outlook or Microsoft 365. Follow these steps to automatically forward all emails from notify@payments.interac.ca to interac@colib.io, so that Colib can match your e-Transfers with your invoices.
Good news: unlike Gmail, Microsoft 365 does not send a confirmation email and does not require any verification. However, Microsoft 365 business accounts block forwarding to external addresses by default: step 5 is required for the rule to work.
Before you start: turn on the automation and enter your Outlook address in Settings > Payments > Interac payments (www.colib.io/settings?show=payment), see How to set up Interac payment automation? Step 5 requires the administrator account of your Microsoft 365. If you manage your account yourself, it is usually the account you use for your email; otherwise, ask the person who manages your Microsoft 365 to do step 5.
1Open your mailbox rules
We recommend using Outlook on the web (or the new Outlook for Windows and Mac). Rules created there run on Microsoft's servers, so they work at all times, even when your computer is turned off.
- Go to outlook.office.com and sign in with your Microsoft 365 account.
- Click the gear icon in the top-right corner to open Settings.
- Select Mail, then Rules.
- Click + Add rule.
2Create the forwarding rule
- In Name your rule, enter Forward Interac notifications to Colib.
- Under Add a condition, select From and enter notify@payments.interac.ca. Press Enter so the address is added as a recipient chip.
- Under Add an action, select Forward to and enter interac@colib.io. Press Enter to confirm the address.
- Leave Stop processing more rules unchecked, so your other rules keep working.
- Click Save.
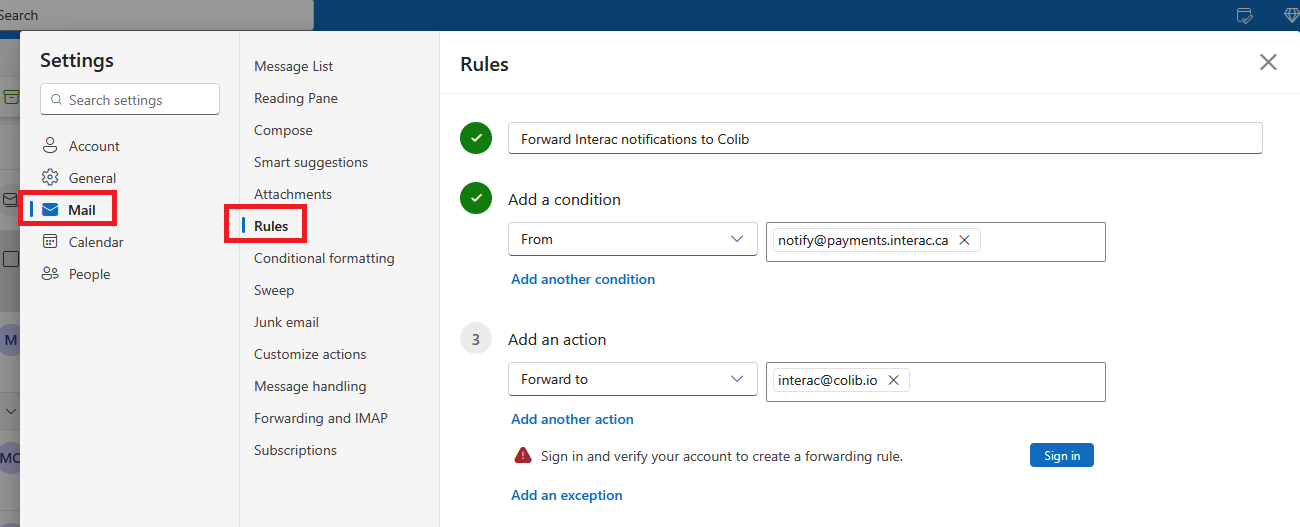
If Outlook shows Sign in and verify your account to create a forwarding rule (personal Microsoft accounts), click Sign in and follow the instructions, then save the rule.
Use Forward to, not Redirect to. Redirected messages keep the original sender and can be rejected on delivery. Forwarded messages are correctly delivered and processed.
A copy of every Interac notification stays in your own mailbox. Forwarding does not delete anything.
3Make sure Interac emails don't land in Junk
Rules are not applied to messages that Microsoft moves to the Junk Email folder. To avoid missed notifications:
- Go to Settings > Mail > Junk email.
- Under Safe senders and domains, click + Add.
- Enter notify@payments.interac.ca.
- Click Save.
4Check that it works
Do this check once step 5 is done. The rule only applies to new incoming emails. Existing messages already in your inbox are not forwarded.
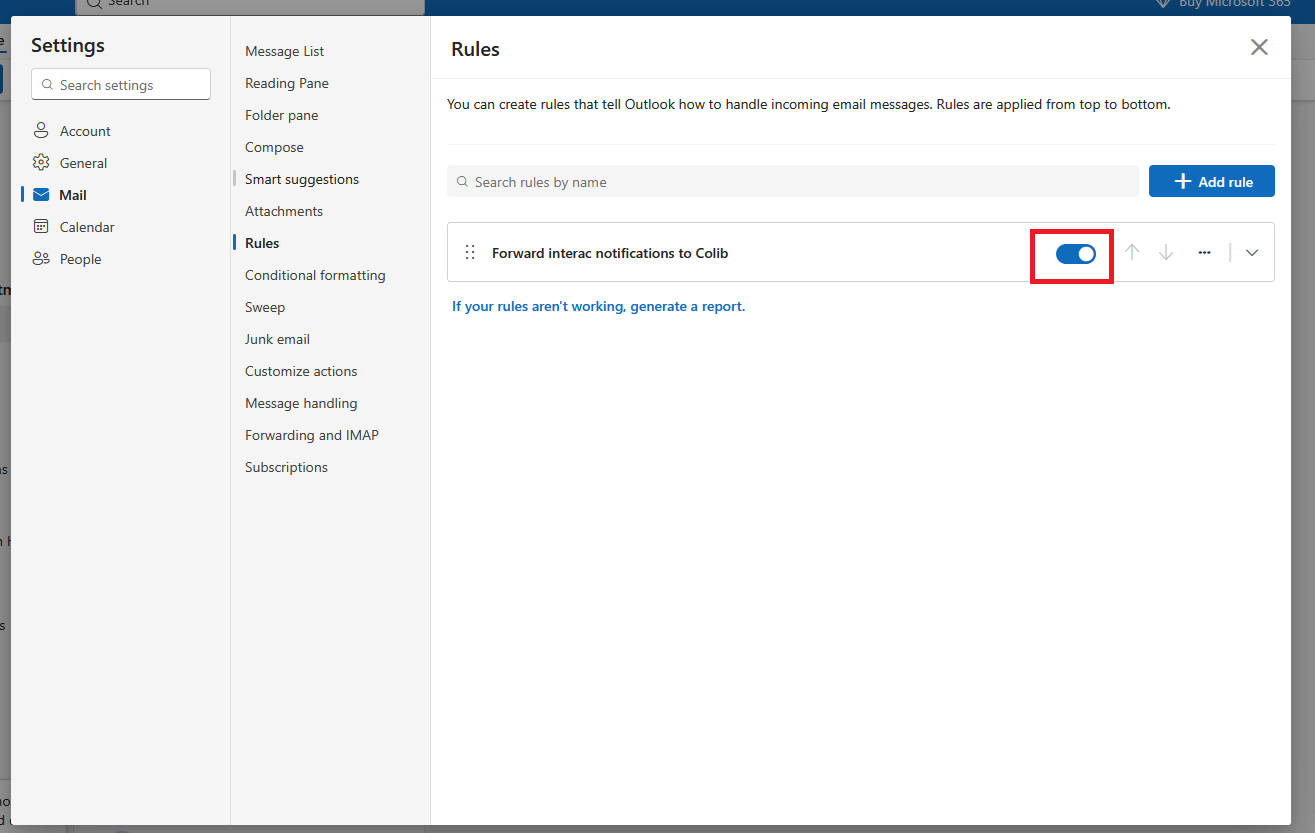
- Check in Settings > Mail > Rules that the rule is enabled (switch on).
- Wait for the next Interac notification, or send yourself a test Interac transfer.
- Confirm the email arrives in your inbox and that no delivery failure notice appears. If you receive one, forwarding is still blocked: see step 5 and the troubleshooting section below.
5Allow forwarding outside your organization (required)
By default, Microsoft 365 business accounts block automatic forwarding to external addresses, and interac@colib.io is an external address. The rule is saved without any error, but each Interac notification then comes back to you as a delivery failure notice and never reaches Colib. This step is therefore required for the forwarding to work.
What the notice looks like: its subject starts with Undeliverable: and it contains 550 5.7.520 Access denied, Your organization does not allow external forwarding.
Your rule is correct: do not change it. The Redirect to action and the Settings > Mail > Forwarding option are blocked in exactly the same way. To allow forwarding:
- Sign in to the Microsoft Defender portal with the administrator account of your Microsoft 365. If you manage your Microsoft 365 account yourself, it is usually the account you use for your email.
- Go to Email & collaboration > Policies & rules > Threat policies > Anti-spam.
- Click + Create policy, then Outbound.
- Name the policy, for example Forwarding to Colib, then click Next.
- Under Users, add the mailbox that contains the forwarding rule, then click Next.
- Under Forwarding rules, set Automatic forwarding rules to On – Forwarding is enabled, then click Next.
- Review the settings and click Create.
Changes can take up to an hour to apply. Your Outlook rule then works as is, with nothing else to do. A policy limited to this single mailbox keeps the stricter default protection in place for everyone else. You can also open the Anti-spam outbound policy (Default), click Edit protection settings and change the same setting: forwarding is then allowed for every mailbox of your organization.
Note: if the address that receives the Interac notifications is an alias or a shared mailbox, add to the policy the main mailbox it belongs to.
Important: if the portal says you do not have the required permissions, the person or company that set up your Microsoft 365 account must make this change. If you bought Microsoft 365 through GoDaddy, contact GoDaddy support.
Using classic Outlook for Windows instead
If you prefer to create the rule from the classic Outlook desktop app:
- Open Outlook and go to File > Manage Rules & Alerts.
- Click New Rule, then Apply rule on messages I receive.
- Select from people or public group and enter notify@payments.interac.ca.
- Select forward it to people or public group and enter interac@colib.io.
- Name the rule and click Finish.
Important: a rule created this way may run only while Outlook is open on your computer. If Outlook displays This is a client-only rule, create the rule in Outlook on the web instead (step 1) so it runs continuously on the server.
Troubleshooting
| Symptom | What to check |
|---|---|
| Bounce message with error 5.7.520 | External forwarding is blocked by your Microsoft 365 account. Complete step 5. |
| Nothing is forwarded, no error | Check that the Interac emails are not going to Junk Email, and that the rule is switched on in Settings > Mail > Rules. |
| The rule works only when my computer is on | It was created as a client-only rule in the classic Outlook desktop app. Recreate it in Outlook on the web. |
| Older Interac emails were not forwarded | Rules apply to new incoming emails only. Forward past notifications manually if needed, or record those payments on the invoices by hand. |
| The emails are forwarded but no payment appears in Colib | Check that the Outlook address is the one entered in Colib, in Settings > Payments > Interac payments. |
| I switched to Redirect to, or used Settings > Mail > Forwarding, and the notifications still bounce | These options are blocked in the same way. Go back to the Forward to rule of step 2 and complete step 5. |
| Step 5 is done, but the 5.7.520 error continues | Wait up to an hour after the change. Check that the policy applies to the mailbox that contains the rule (the main mailbox if the address is an alias or a shared mailbox). If another outbound policy with automatic forwarding turned off also applies to this mailbox, give your policy a higher priority. |
| Notifications bounced before step 5 was done | They are not processed again. Forward them manually to interac@colib.io (manual forwarding is not blocked), or record those payments on the invoices by hand. |
Good to know
- Gmail? — see How to automatically forward Interac notification emails in Gmail?
- Follow your payments — the payments received appear in Invoices > Interac Payments (www.colib.io/invoices?show=interac).
Still have a question?
Still stuck? Contact us at support@colib.io and we will help you finish the setup.
Was this article helpful?
That’s Great!
Thank you for your feedback
Sorry! We couldn't be helpful
Thank you for your feedback
Feedback sent
We appreciate your effort and will try to fix the article