Who is this article for?
You are moving to Colib from another system and you do not want to re-enter your clients one by one. The Batch upload page imports, in one zip file, your clients, their notes, their appointments and their documents.
This article explains how to prepare the file, upload it, check the result and fix the rows Colib could not import.
Before you start: create your team members, your clinics and your appointment types in Colib first. The file refers to them (practitioner email address, clinic name, appointment type), and a row that points to something missing is not imported. You need the right to edit client information to use the batch upload.
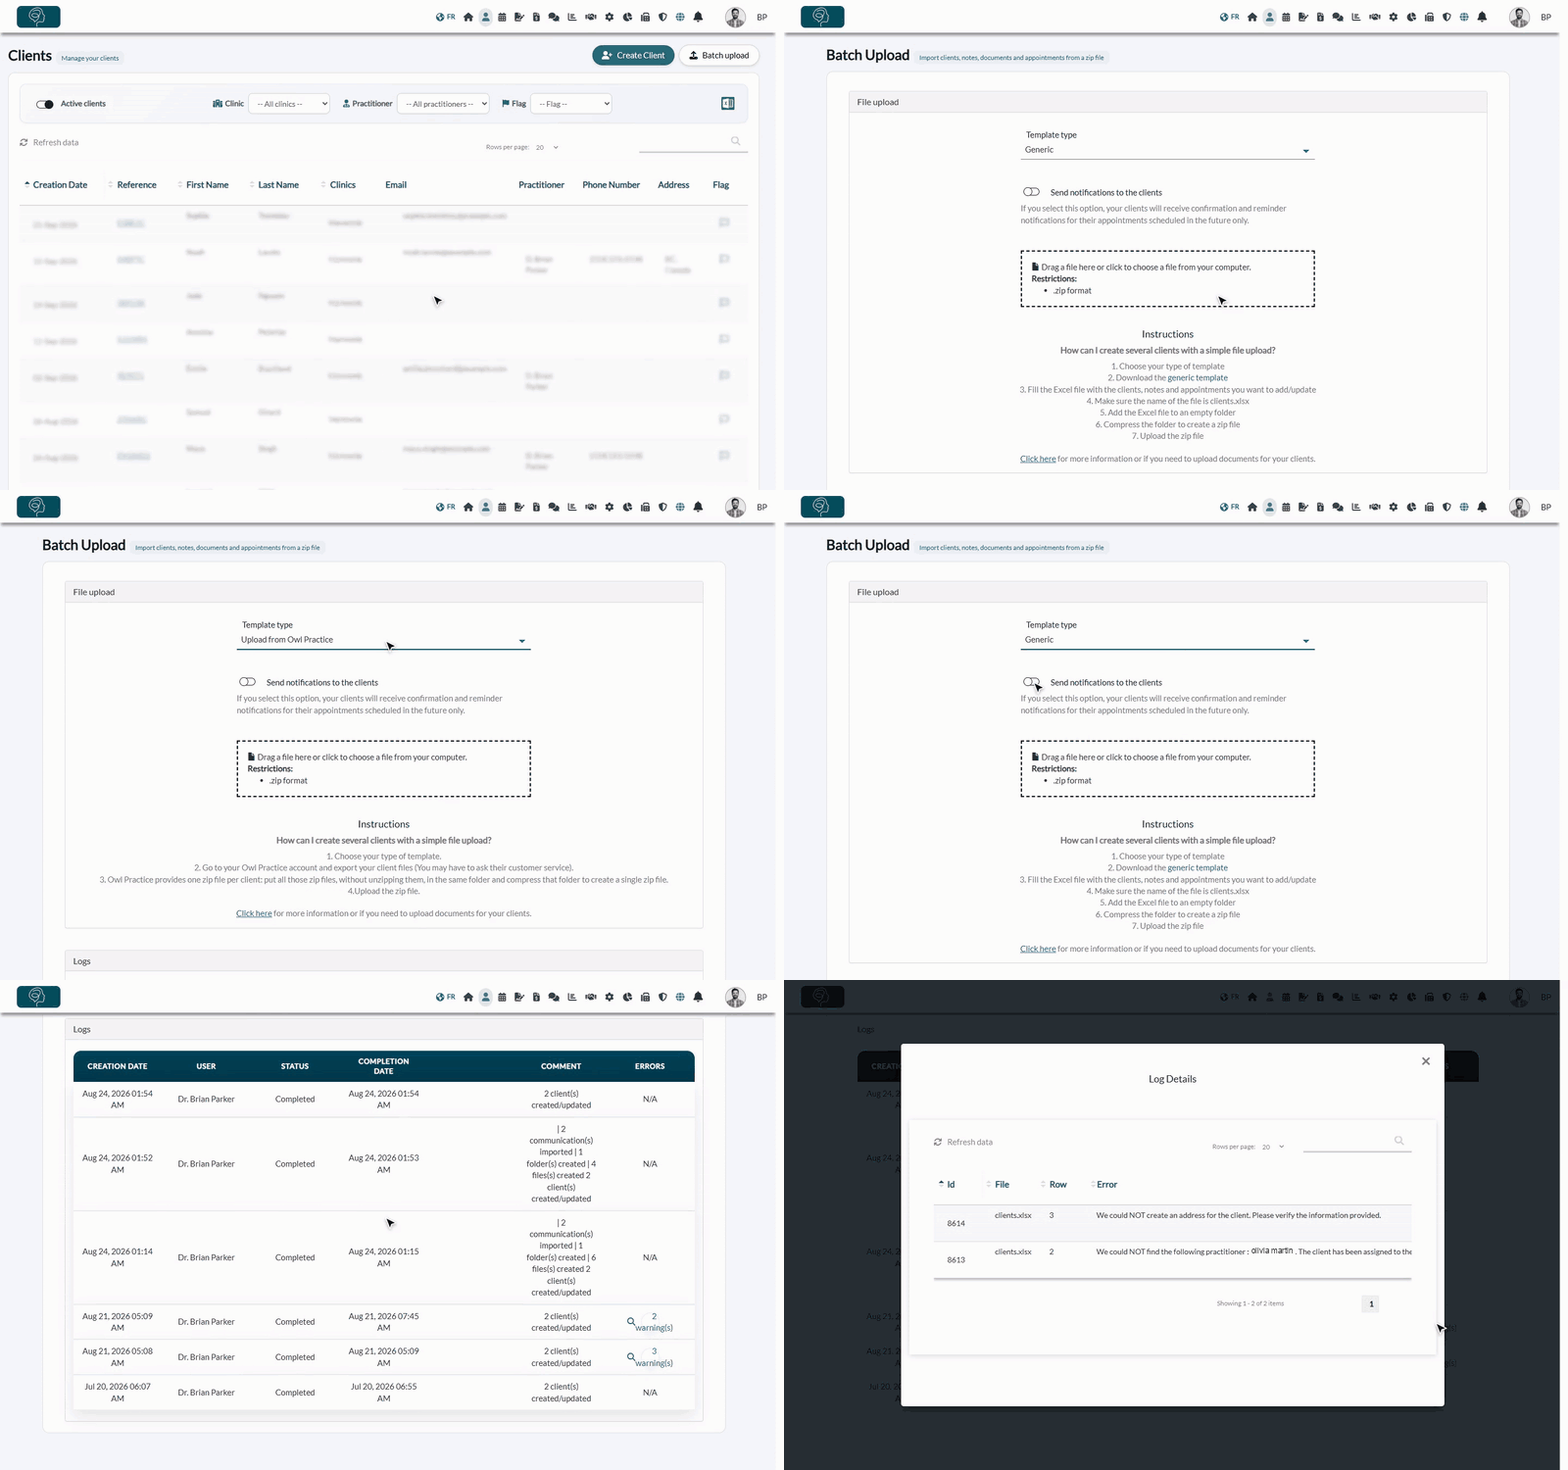
1Open the Batch upload page
- Go to your client list (www.colib.io/clients).
- Click Batch upload at the top right. You can also go directly to www.colib.io/uploadclients.
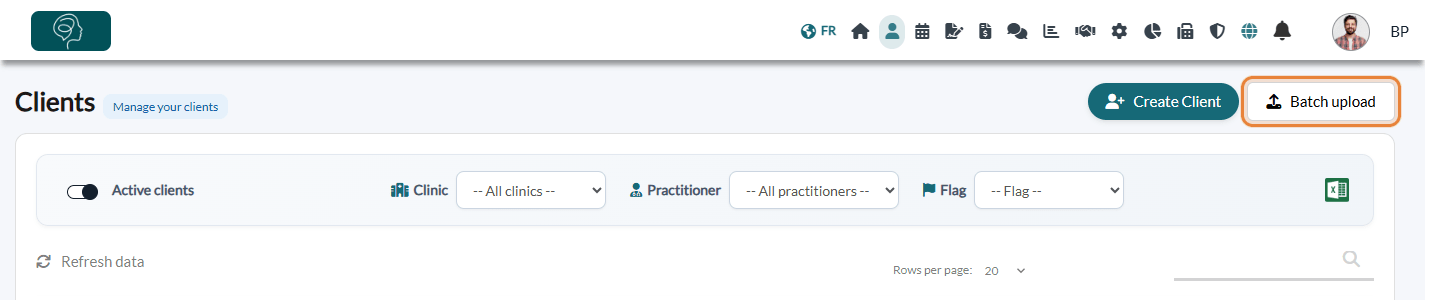
2Choose the template of your old system
In Template type, choose where your data comes from. The instructions under the drop zone change with the template.
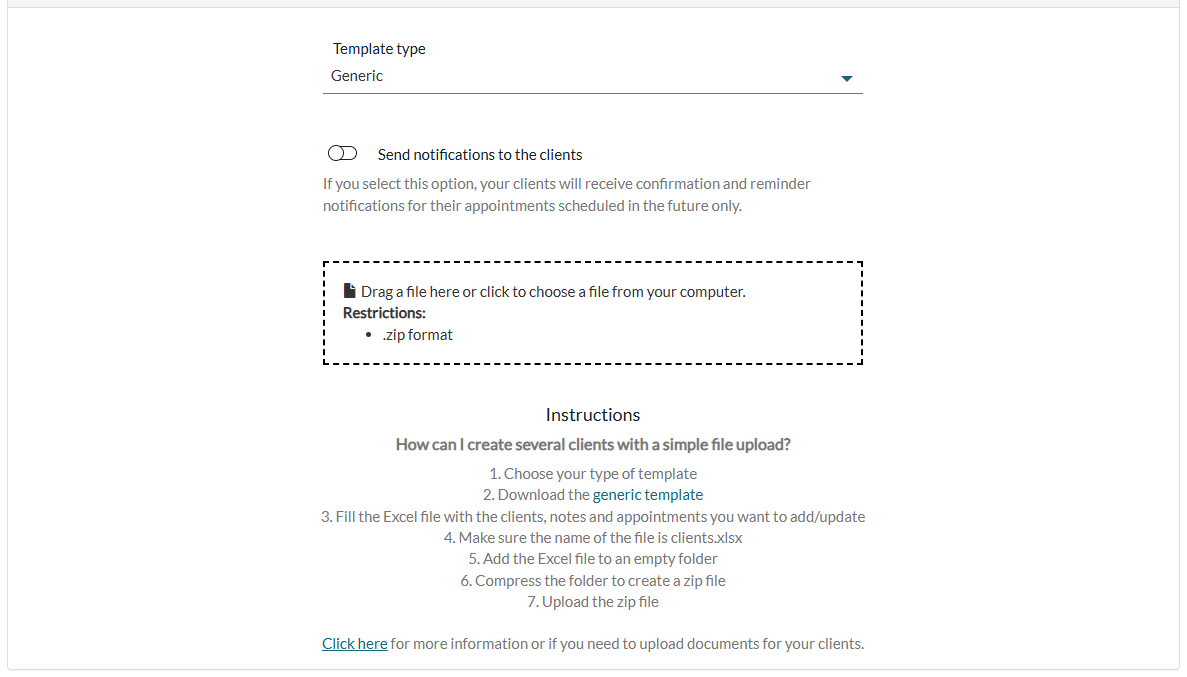
| Template type | What you upload |
|---|---|
| Generic | Any other system. Download the generic template (Excel file clients.xlsx) from the instructions and fill it in (see step 3). |
| Upload from Jane | Your Jane client export pasted into the Export tab of the Colib template, plus, for appointments, a second file made from the appointments template. Both templates are downloaded from the instructions. |
| Upload from Psylio | The client export provided by Psylio (you may have to ask their customer service), as a zip file. |
| Upload from Noterro | The client files exported from Noterro, as a zip file. Each client has their own folder, named with their name and their reference between parentheses, for example John Smith (4954337). |
| Upload from Medexa | Your Medexa patient list pasted into the Patients tab of the Colib template, and your notes in its Notes tab. |
| Upload from Owl Practice | The zip files provided by Owl Practice (one per client). Put them, without unzipping them, in the same folder and compress that folder into a single zip file. |
Which template for my old system? Use this table to find the template that matches the software you are leaving.
| Your old system | Template to choose | How to proceed |
|---|---|---|
| Jane (JaneApp) | Upload from Jane | Export your clients from Jane, then follow the Jane instructions shown on the page. |
| Psylio | Upload from Psylio | Ask Psylio for the export of your client files and upload the zip file as is. |
| Noterro | Upload from Noterro | Export your client files from Noterro and upload the zip file. |
| Medexa | Upload from Medexa | Export your patient list and your notes from Medexa, then copy them into the Colib template. |
| Owl Practice | Upload from Owl Practice | Group the zip files of your clients into a single zip file. |
| LePsy, Go Rendez-vous, Cliniko or any other system | Generic | There is no dedicated template for these systems. Export your client list (and, if possible, your appointments and notes) from your old system as an Excel or CSV file, then copy each column into the matching column of the generic template (step 3). |
3Fill in the generic template
The generic template has one tab per type of data. Columns marked with (*) are required.
| Tab | Content |
|---|---|
| Clients | First and last name (required), email, phone, reference, birth date, gender, occupation, emergency contact, general information, email address of the practitioner, address, language (en / fr), creation date, active (Y/N), referral and clinic(s). The template you download also has one column per additional field of your practice. |
| Notes | Client first and last name (required), date, title and text of the note. The note is added to the client with the same name. |
| Appointments | Start and end date and time (required), appointment type (required, as named in Colib), email address(es) of the client(s) separated by commas (required), email address of the practitioner (required), room code, description and title. |
| ThirdPartyPayers | Optional: the coverage of clients funded by a third-party payer (payer name or ID, policy number, dates, authorized hours, total funded amount). |
- Write dates as YYYY-MM-DD and appointment times as YYYY-MM-DD HH:mm, in the time zone of your practice.
- Do not leave empty rows in the middle of a tab.
- Keep the file name clients.xlsx.
- An appointment type must exist in Settings > Appointments (www.colib.io/settings?show=appointments) and the practitioner must be a member of your team.
4Add the documents (optional)
To import documents (PDF, images, etc.) into the client records:
- Put clients.xlsx in an empty folder.
- In that folder, create one sub-folder per client, named with the client's email address, exactly as in the Clients tab.
- Put the client's documents in their sub-folder.
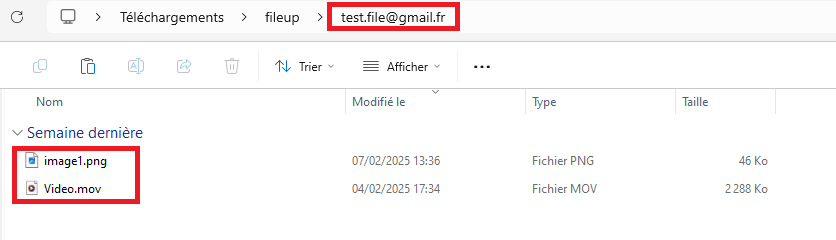
Example of structure: the main folder contains clients.xlsx and one folder per client named after their email address; each of these folders contains that client's files.
5Compress and upload the file
- Compress the main folder into a .zip file (right-click > Compress or Send to > Compressed folder).
- Back on the Batch upload page, check the template type.
- Choose whether to turn on Send notifications to the clients (see below).
- Drag the zip file onto the drop zone, or click it to choose the file. A message confirms that the file is being processed. For a large file, stay on the page until the upload is finished.
Important: with Send notifications to the clients turned on, your clients receive confirmation and reminder notifications for their future appointments. Leave it off if you do not want your clients to be contacted during the migration. Also, if your welcome email is set to be sent automatically to all new clients, every client created by the import receives it: see How to configure and send the welcome email to clients.
6Check the result in the logs
The Logs section lists your imports with their status (Initiated, In progress, Completed or Completed with errors) and a summary: number of clients created or updated, appointments, documents and folders created, rows not imported.
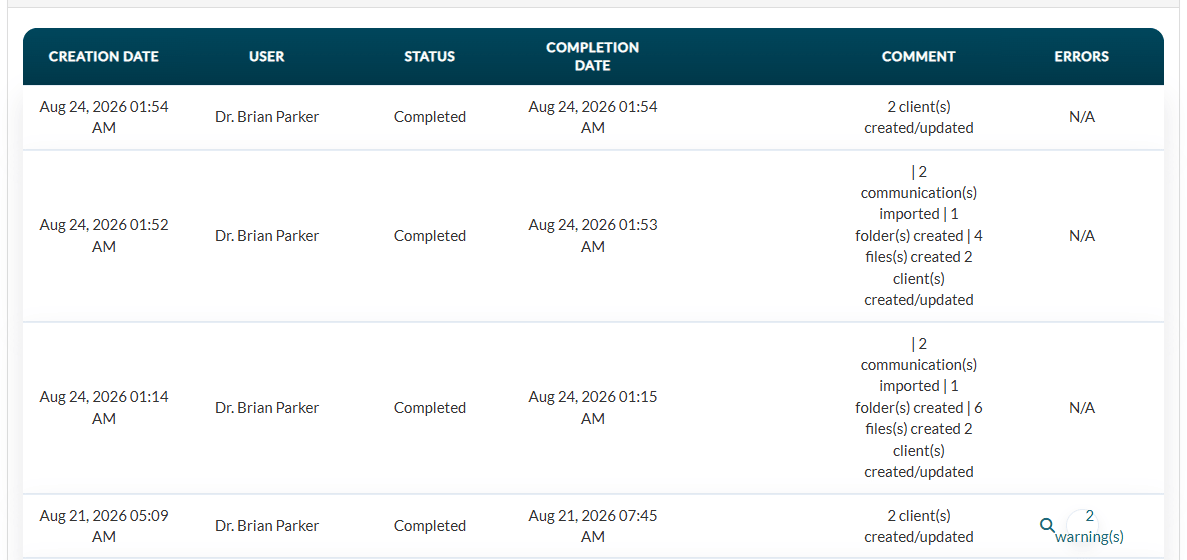
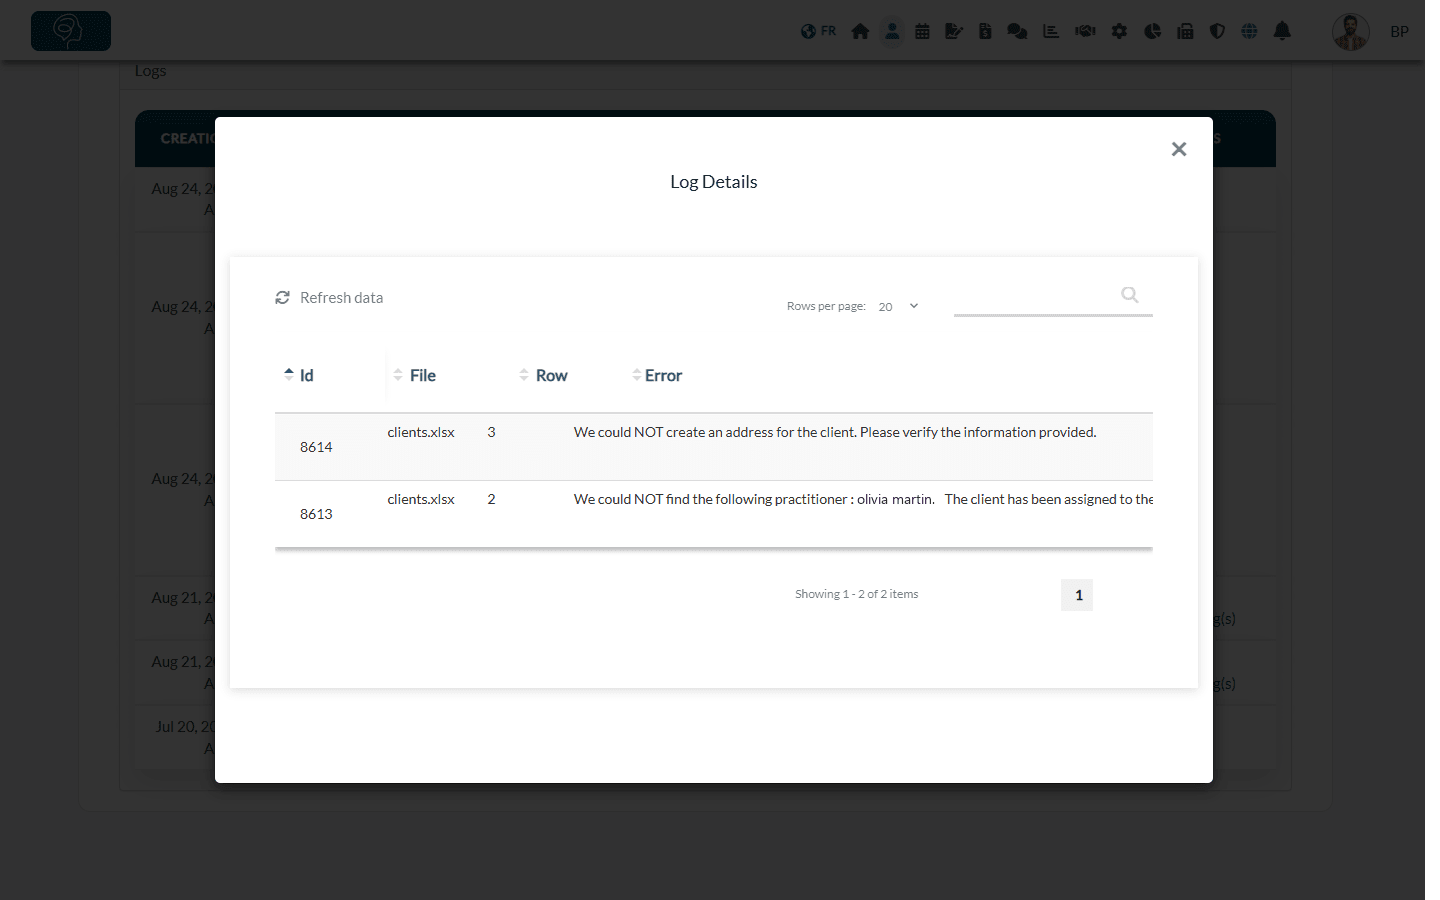
When the Errors column shows warnings, click it: the window lists the file, the row and the reason (invalid email or date, appointment type or practitioner not found, etc.). Fix those rows in your file and upload it again.
What can be migrated?
| Data | Imported? | How |
|---|---|---|
| Client records | Yes | Clients tab of the template (or the export of your old system): identity, contact details, main practitioner, clinic(s), your custom fields, etc. |
| Notes | Yes, as text | Notes tab: date, title and text. Imported notes are not signed and are recorded under the name of the person who runs the import. Notes provided as PDF files can be imported as documents instead. |
| Appointments | Yes | Appointments tab: past and future appointments, with their type, client(s) and practitioner. |
| Documents | Yes | One folder per client in the zip file (step 4): PDF, images, etc. Treatment plans, old invoices, completed forms or letters exported as files from your old system are imported this way. |
| Third-party payer coverage | Yes | ThirdPartyPayers tab (optional). |
| Invoices, payments and saved cards | Not as invoices | Invoices and payments are not recreated in Colib: import their PDF as documents. Payment cards cannot be transferred: your clients enter their card again. |
| Completed forms, scores and messages | Not as such | Import the completed forms as PDF documents. Scores can be entered for past dates in the Scores/Goals tab. Messages are not imported. |
Moving clients from another Colib account
The batch upload also works between two Colib accounts, for example when a practitioner leaves a practice for their own account, or when several practitioners bring their accounts together into one practice. Start from the exports of the old account: the Excel export of the client list (clients and notes), the export of the scheduler (appointments) and the complete record of each client (documents, invoices and forms as PDF). Copy each column into the generic template, then upload it as explained above. See How to export my client data.
- Practitioner — the exports give the name of the practitioner; the template asks for their email address in the new account.
- Address — the client export gives the address in one column; the template has separate columns for the street, city, postal code, province and country.
- Appointments — the scheduler export gives the names of the clients; the template asks for their email addresses.
- Notes — the text of each note goes into the Notes tab with the first and last name of the client. The notes become unsigned notes of the new account; to keep the signed version, also import the PDF of the notes as documents.
Step-by-step guides: please see the article titled "How to move from a multi-practitioner practice to separate Starter accounts" and the article titled "How to bring several Colib accounts together into one practice".
Good to know
- Uploading the file again does not create duplicates — a client with the same email address and the same name is updated, and an appointment at the same date and time with the same practitioner is updated.
- Some empty cells do not erase anything — when you update a client, an empty email, phone, birth date, emergency contact or general information cell keeps the information already in Colib.
- Missing first or last name — the row is not imported and appears in the log details.
- Duplicates after the import — merge them: see Can I merge two client accounts?.
- Need help with your file? — send us your questions before the migration, we are happy to check your file with you.
Still have a question?
Write to us at support@colib.io, we will be happy to help.
Was this article helpful?
That’s Great!
Thank you for your feedback
Sorry! We couldn't be helpful
Thank you for your feedback
Feedback sent
We appreciate your effort and will try to fix the article