Who is this article for?
The Scores/Goals feature lets practitioners track their clients' progress over time by defining goals. Colib supports two types of goals:
- Scale of options — the client (or the practitioner) picks an answer from a predefined scale. Each option combines a text label with a numeric value (for example Never / Sometimes / Often).
- Numeric measurement — a free numeric value with a unit, ideal for health measurements such as weight (kg or lb), blood pressure (mmHg) or blood glucose (mmol/L).
Goals are organized into categories (for example Anxiety assessment, Health measurements). Each category is displayed as its own table in the client record, with progress charts. Your clients can also answer goals themselves through your forms.
This article explains how to turn on the feature, create categories and goals, add them to a form, and follow the results in the client record.
Before you start: goals are managed in Settings > Goals (www.colib.io/settings?show=goals). You need access to the practice settings to create, modify or delete them.
1Turn on the feature
- Go to www.colib.io/settings?show=goals. You can also click Settings in the top bar, then Goals in the Admin menu on the left.
- In the Scores and Goals section, turn on Enable score/goals feature.
- The categories and goals of your practice are displayed below the toggle, with the number of Entries already recorded for each goal.
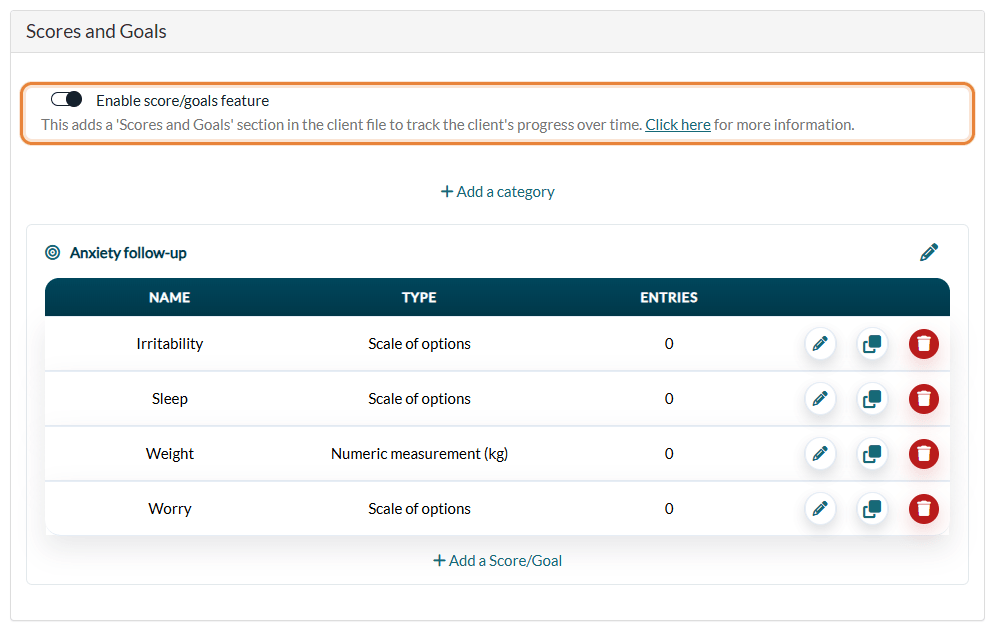
Once the feature is on, every client record shows a Scores/Goals tab (see step 5).
2Create your categories
- Click + Add a category.
- Enter its Name (for example Anxiety follow-up) and click Save.
- Rename a category — click the pencil icon on its title, at any time.
- Delete a category — the trash icon only appears once the category no longer contains any goals. Move its goals to another category or delete them first.
- Goals created before categories existed — if you were already using Scores/Goals before categories were introduced, your existing goals were automatically placed in a category named Default. You can rename it, or create new categories and reorganize your goals.
3Create your goals
- Inside a category, click + Add a Score/Goal.
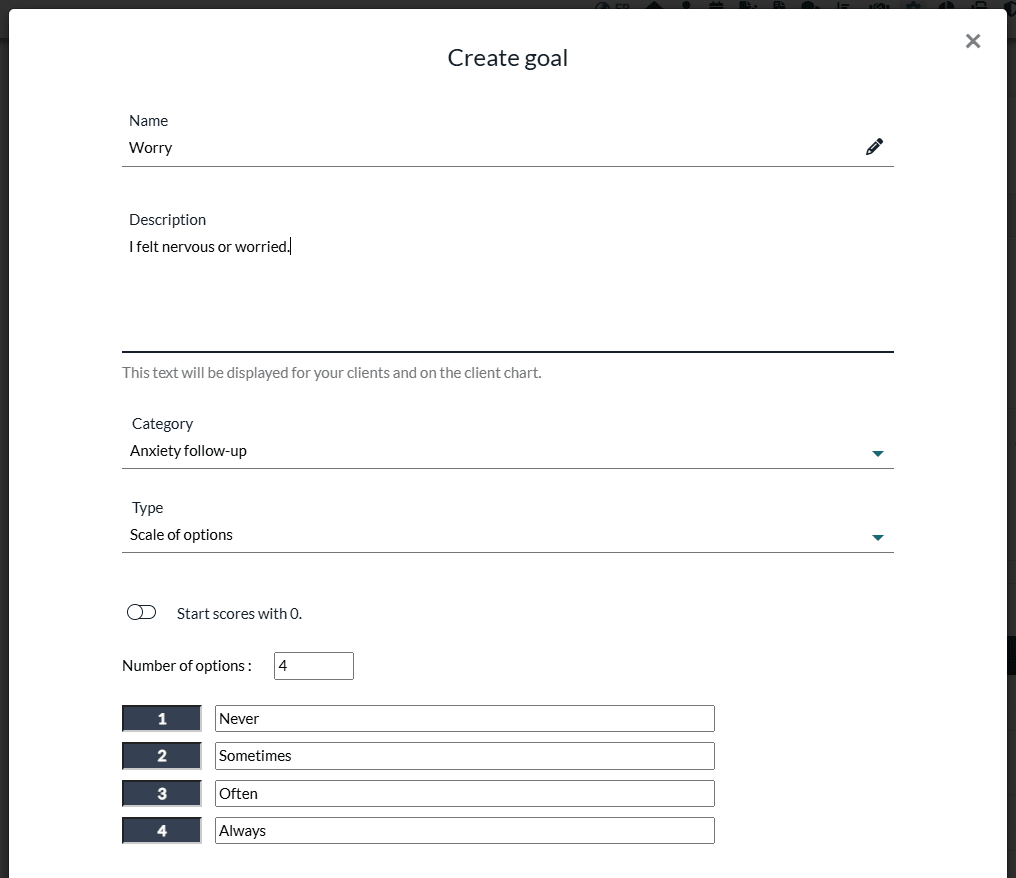
- Enter the Name of the goal: it is shown in the client record and in your settings.
- Enter the Description: this is the text your clients see on your forms, and the subtitle of the chart. Write it as a question or a statement the client can answer (for example I felt nervous or worried.).
- Check the Category the goal belongs to.
- Choose the Type:
- Scale of options — set the Number of options (from 2 to 100) and type the text of each option. Each option gets a value (1, 2, 3...); turn on Start scores with 0. to start at 0 instead.
- Numeric measurement — enter the Unit displayed next to the values (for example kg, lb, mmHg, mmol/L). No options are needed.
- Click Save. The goal appears in the table of its category.
Tip: for blood pressure, create two measurement goals (Systolic and Diastolic) in the same category.
On each row of the table, the pencil icon edits the goal, the copy icon duplicates it (handy to create a similar goal with the same options), and the trash icon deletes it.
Important: once a goal has recorded entries, its type can no longer be changed (scale values and measurements are not convertible). You can still edit its name, description, category or unit. Deleting a goal removes it from your forms and permanently deletes all the scores recorded for it in your clients' records.
4Add your goals to a form
You can ask your clients to record their answers and measurements directly through your forms. Their answers are saved in their record automatically.
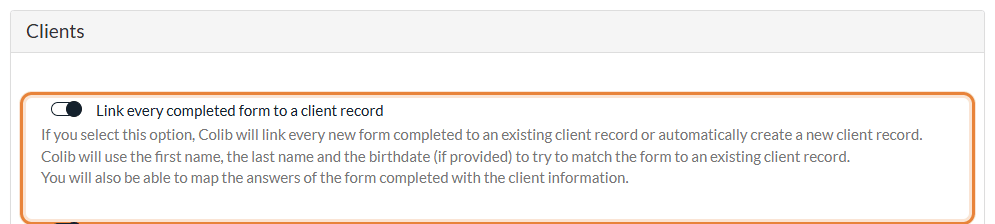
- Check that Link every completed form to a client record is turned on in Settings > Forms, Clients section (www.colib.io/settings?show=signature). Without this option, the scores answered in a form are not saved in the client record.
- Go to Forms (www.colib.io/forms), open your form (or create one) and click Sections & Questions.
- Click Add Section. Optionally, enter a title for the section (for example Your week).
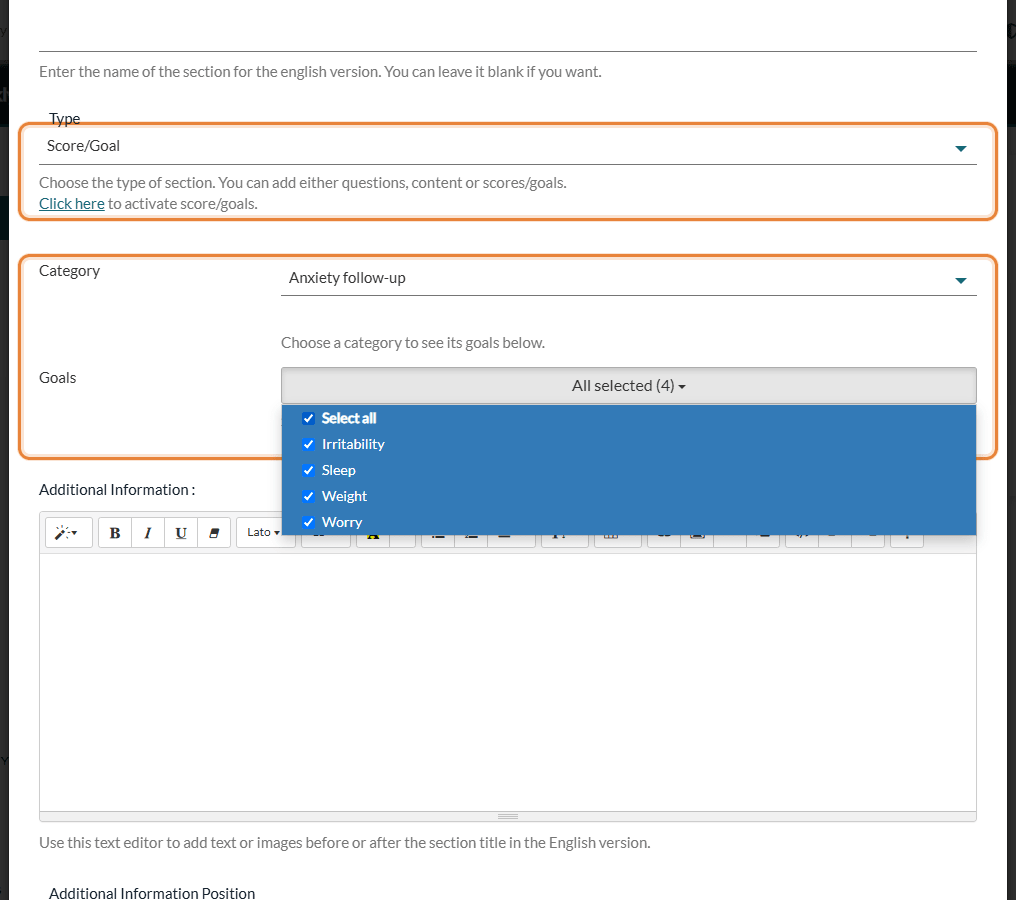
- In Type, select Score/Goal.
- Choose a Category: the Goals list below then shows the goals of that category.
- Open the Goals list and tick the goals to include (or Select all).
- Click Save. The section appears in the form with the list of its goals.
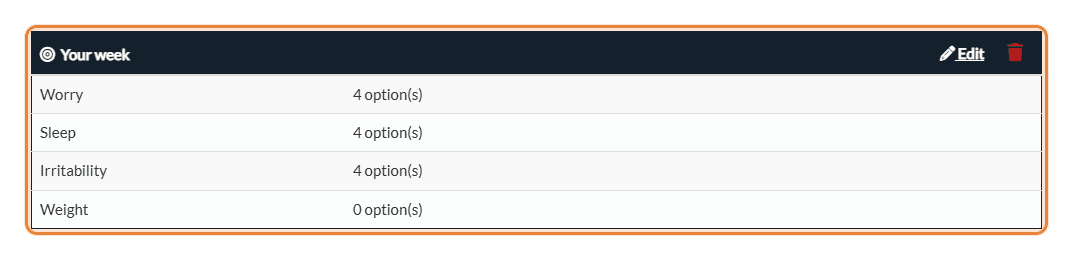
On the form, scale goals appear as a grid of options (the client ticks one option per goal), and measurement goals appear as numeric fields with their unit. Both are required. When the client submits the form, the values are saved in their record for that day and appear on the completed form's PDF.
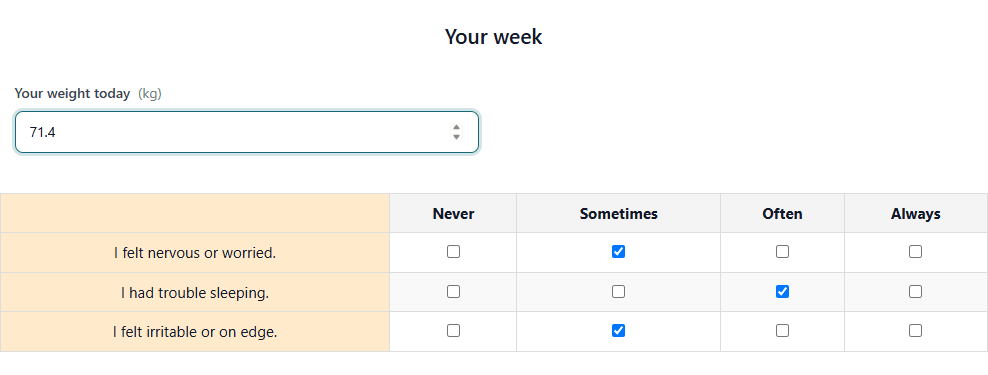
For every detail (what the client sees, sending the form regularly to track progress, limits), please see the article titled "How to include scores and goals in a form".
5Follow the scores in the client record
Open the client's record from your client list (www.colib.io/clients) and click the Scores/Goals tab. You can also click Enter today's scores or History on the Scores/Goals card of the record's overview.
There is one table per category. Each column is a date, and the last column, Today, is used to enter new values:
- Scale goals — pick an option from the list for today (Today column) or change a past entry. The Score (sum) and Average rows at the bottom of the table are calculated on scale goals only.
- Measurement goals — type the value directly in the numeric field (the unit is shown next to the goal's name). You can correct a past value at any time; clearing the field deletes that day's measurement.
- Each value is saved as soon as you choose or type it. If several values are recorded on the same day for a goal (for example through several form submissions), the most recent one is displayed.
- Hover over a value to see its origin (entered in the record, or the form it comes from).
- The trash icon next to a date deletes all the scores of that day for the client, after confirmation.
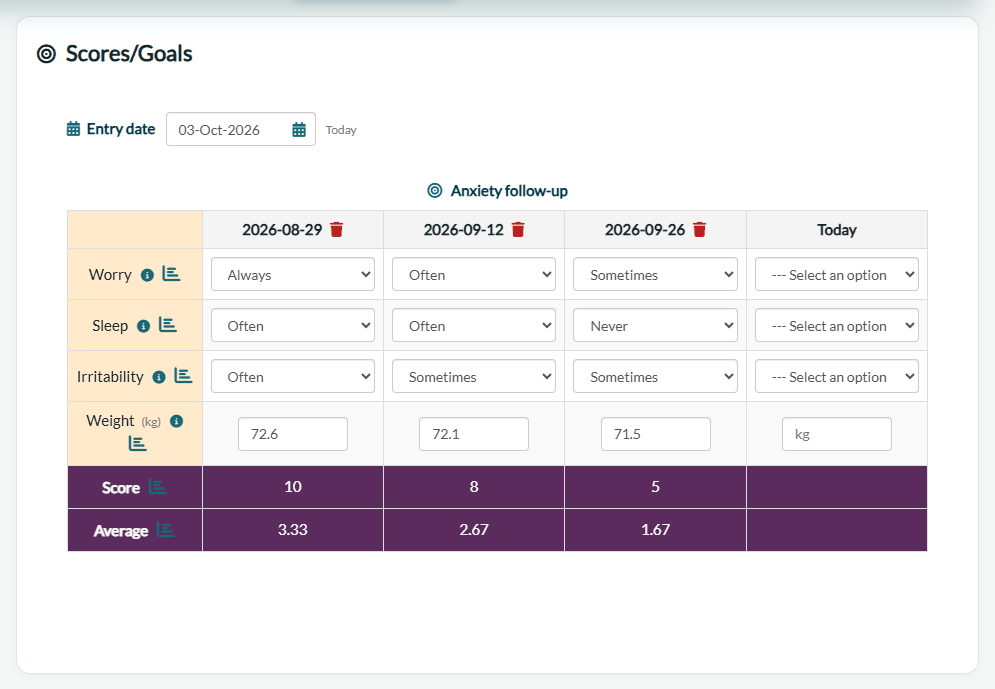
To record scores on a date other than today (a forgotten session, measurements taken at home), use the Entry date above the tables. For more details, please see the article titled "How to enter scores for a past date".
6View the progress charts
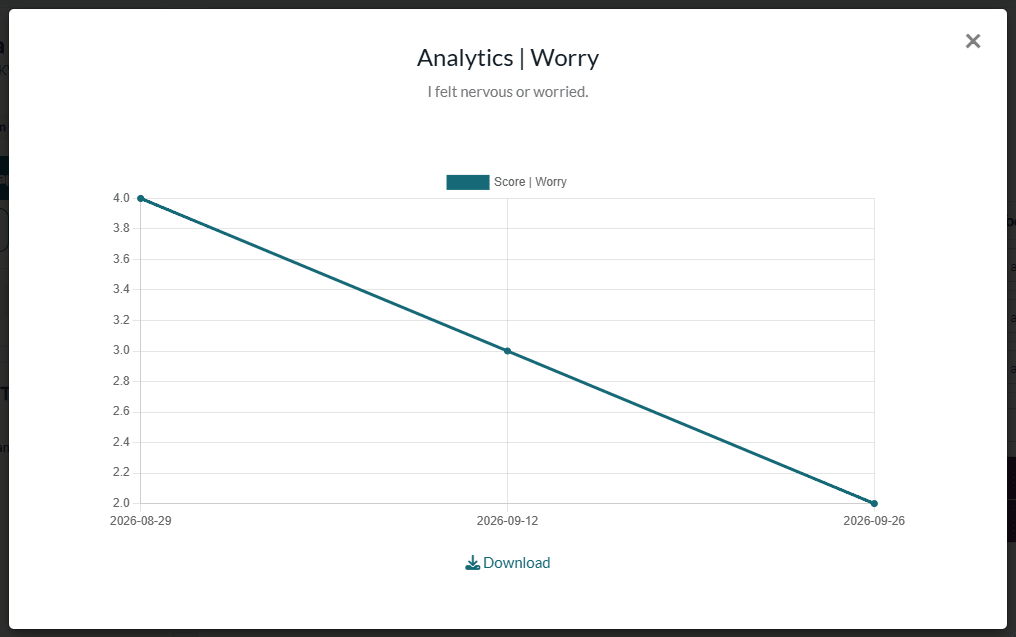
Click the analytics icon next to a goal to display a chart of that goal's evolution over time. For measurements, the chart uses the exact decimal values. The icons next to Score and Average show the evolution of the total and of the average of the category. Click Download under the chart to save it as an image.
Good to know
- Shared by the whole practice — categories and goals are the same for every practitioner and every clinic of the practice.
- Who sees the tab — the Scores/Goals tab is shown to team members who have access to forms.
- Counter-signature — counter-signatures do not work with forms that display goals.
- Track progress regularly — send the same form every week or every month with a recurring sending (How to create a recurrent form sending for a client), or ask for it before each appointment (How can I automatically ask a client to fill out a form before an appointment?).
Still have a question?
Write to us at support@colib.io, we will be happy to help.
Was this article helpful?
That’s Great!
Thank you for your feedback
Sorry! We couldn't be helpful
Thank you for your feedback
Feedback sent
We appreciate your effort and will try to fix the article