Who is this article for?
Some clients come back at the same time every week, every two weeks or every month. Instead of booking each visit by hand, you create a recurring appointment: Colib creates the whole series for you, up to the date of the last appointment.
This article explains how to create a series, how to change it afterwards (one appointment, the following ones, the frequency or the end date), how to stop it, and what your clients are notified of.
Before you start: recurring appointments are created from your scheduler (www.colib.io/scheduler). The client and the appointment type must already exist.
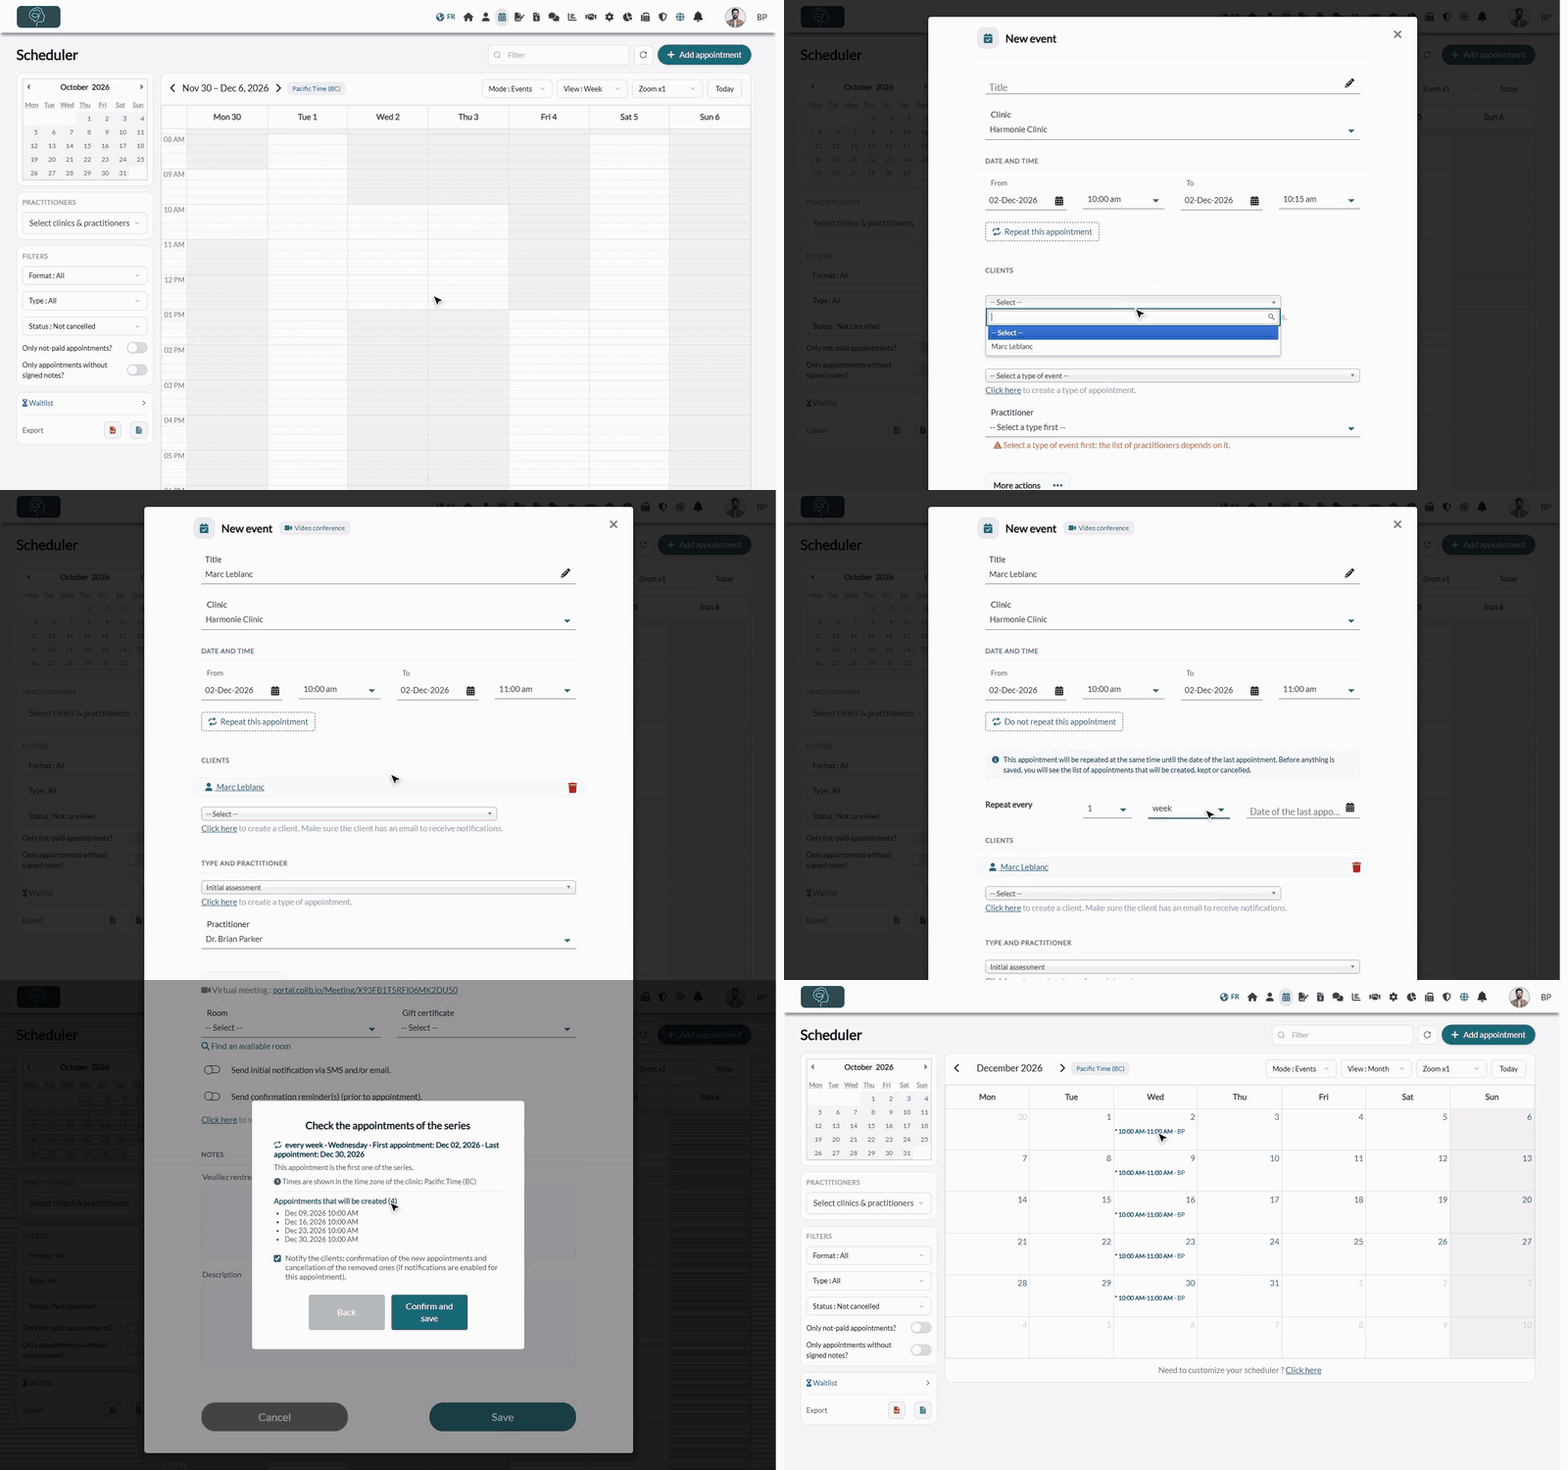
1Create the first appointment
- Go to your scheduler: www.colib.io/scheduler.
- Click Add appointment at the top right, or click directly on the day and time of the first appointment in the calendar.
- Fill in the appointment as usual: date and time, client(s), appointment type and practitioner. See How to create an appointment? for all the fields.
2Set the recurrence
- Under the date and time, click Repeat this appointment.
- In Repeat every, choose the interval and the unit: for example 1 week, 2 weeks or 1 month (units: day, week, month).
- For a monthly series, choose between On day (a fixed day of the month, for example the 7th) and On the (a weekday rank, for example the first Friday or the last Monday of the month).
- Pick the Date of the last appointment. This date is required, and it cannot be more than 18 months from today.
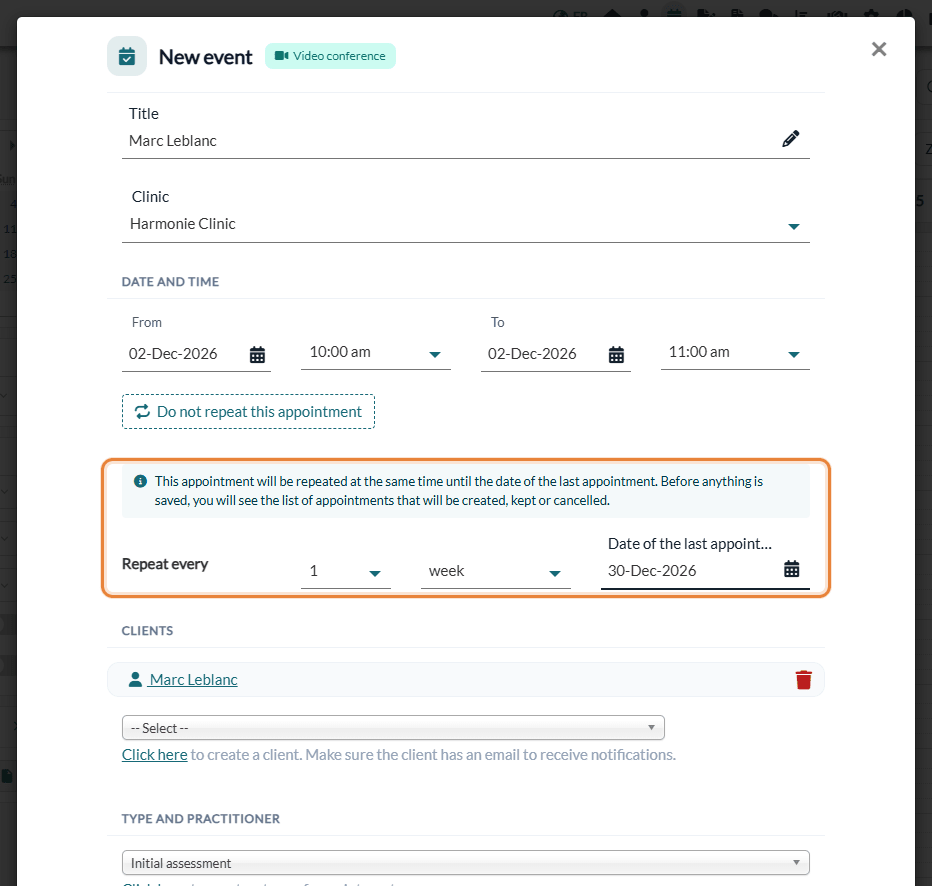
Every appointment of the series is at the same time as the first one, with the same client(s), type, practitioner and options. Changed your mind? Click Do not repeat this appointment to go back to a single appointment.
3Check the series, then save
- Click Save. Before anything is saved, the Check the appointments of the series window opens: it sums up the recurrence (frequency, first and last appointment) and lists the Appointments that will be created. Times are shown in the time zone of your clinic.
- Leave Notify the clients checked to send them the confirmation of the new appointments, or uncheck it to create the series without notifying anyone.
- Click Confirm and save, or Back to change something.
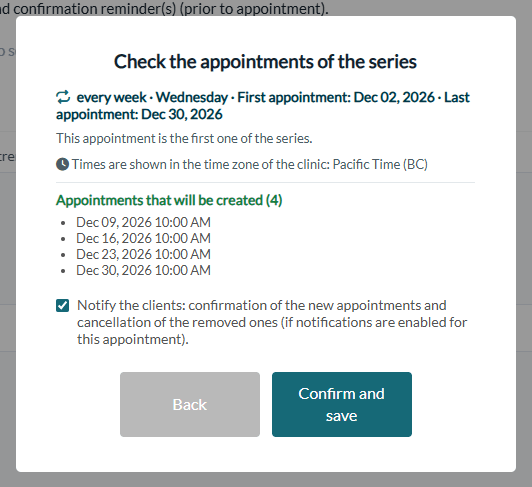
The appointments of the series are created in the background: the message The appointments of the series are being updated appears and the scheduler refreshes by itself when it is done. Wait for it before you open one of these appointments again.
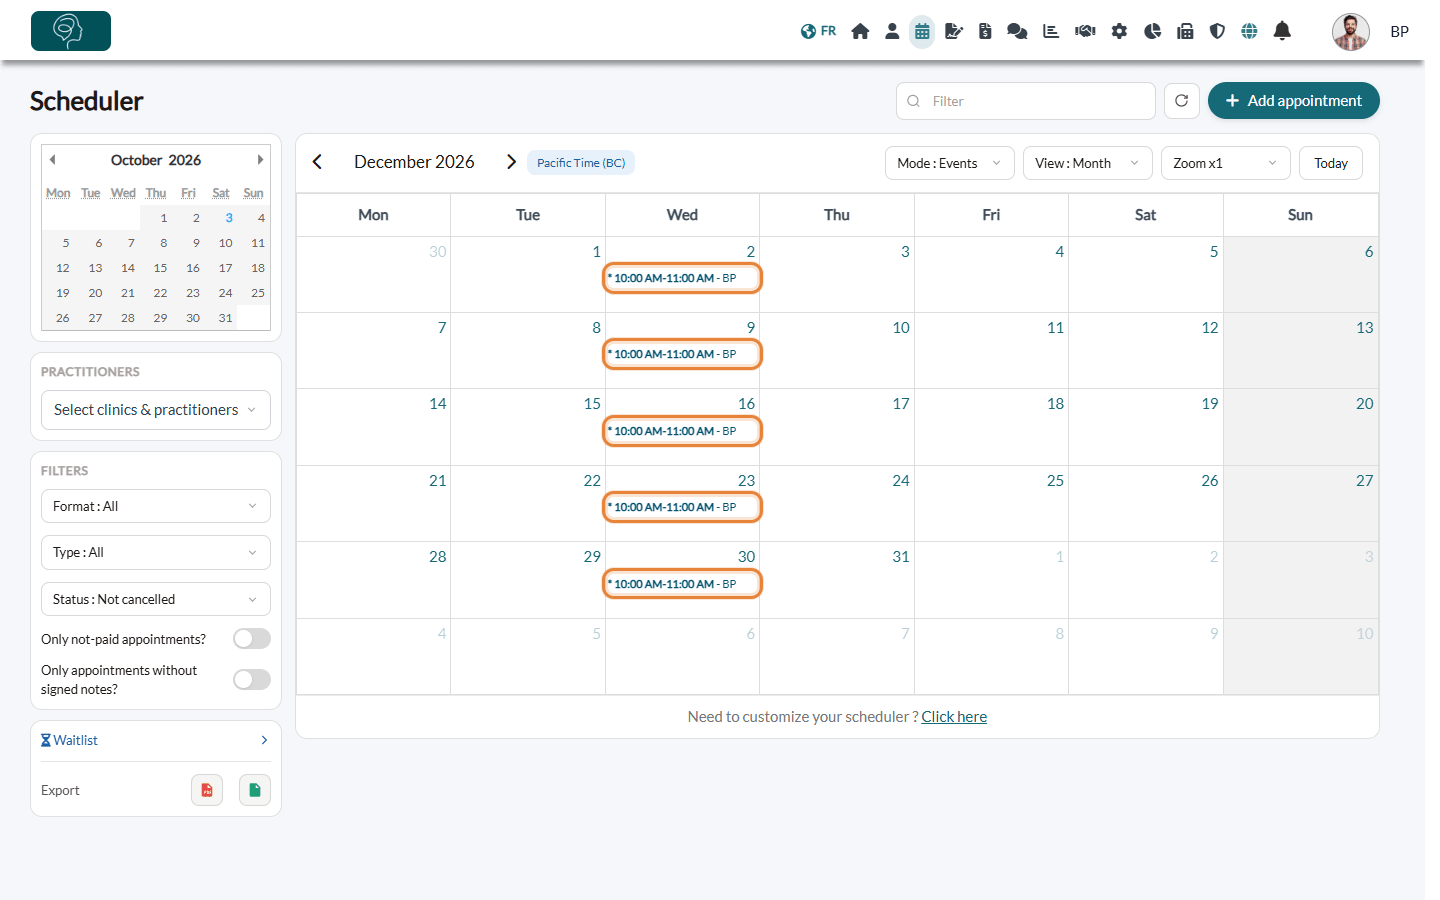
Tip: if the window says that no other appointment will be created, check the frequency and the date of the last appointment. You can also turn an existing single appointment into a series: open it, click Repeat this appointment and save.
How do I edit recurring appointments?
Click any appointment of the series in the scheduler. A Recurring appointment card shows the frequency and the date of the last appointment, with two buttons: Change the recurrence and Stop the series.
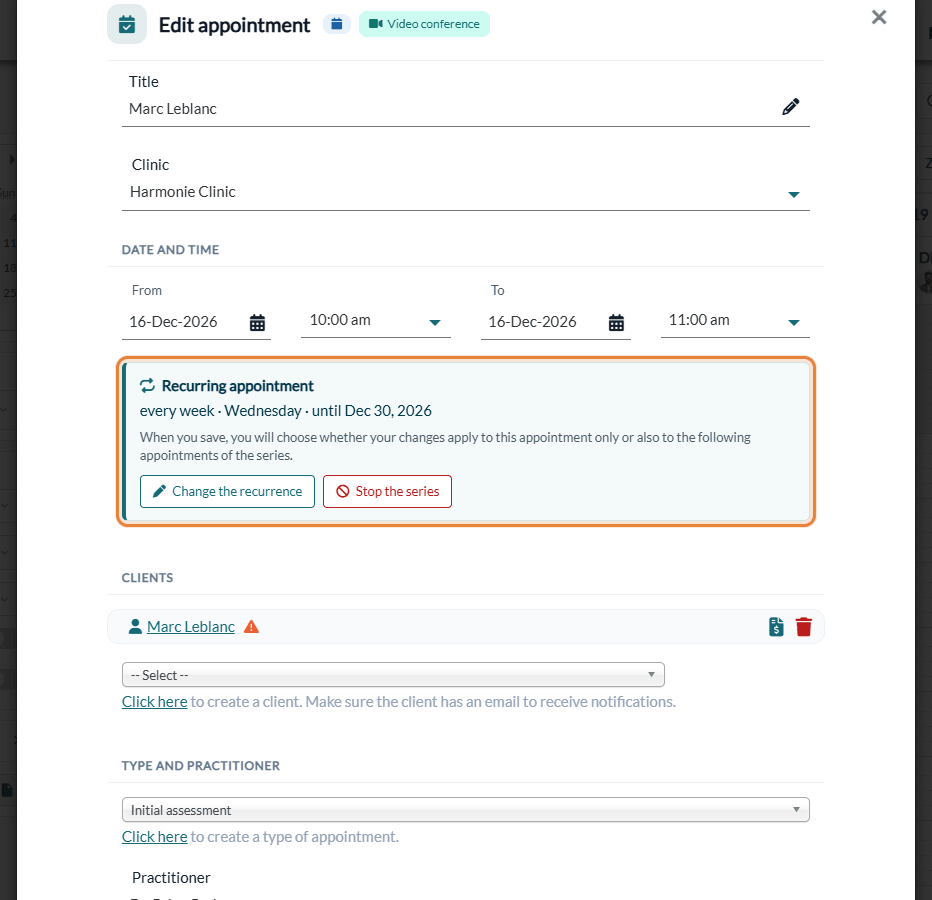
Change one appointment, or this one and the following ones
- Open the appointment and make your changes: time, appointment type, clients, practitioner, room, message...
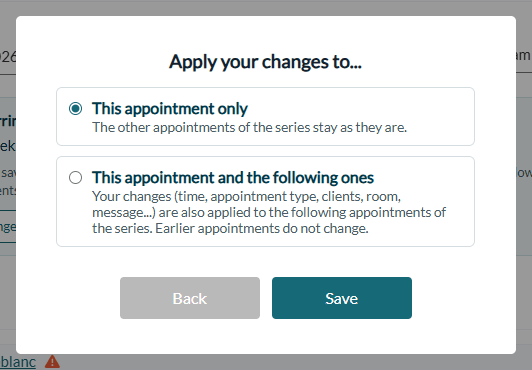
- Click Save. The Apply your changes to... window asks you to choose:
- This appointment only: the other appointments of the series stay as they are.
- This appointment and the following ones: your changes are also applied to the following appointments of the series. Earlier appointments do not change.
- Click Save.
- Moved to another day? If you changed the date of the appointment, This appointment and the following ones is not available: save the new date first (this appointment only), then make your other changes. To move the whole series to another day of the week, change the recurrence instead (see below).
- Status: the status of an appointment (confirmed, completed, no-show...) is never copied to the other appointments of the series.
- Room: the room is copied only to the dates where it is free; otherwise the appointment keeps no room.
Change the frequency
- Open the appointment from which the new frequency must start, then click Change the recurrence.
- Change Repeat every (for example from 1 week to 2 weeks). Keep the current recurrence cancels your changes.
- Click Save. The Check the changes to the series window lists the Appointments that will be created, the Appointments that will be cancelled (they no longer match the new recurrence) and the Appointments kept as they are.
- Choose whether to notify the clients, then click Confirm and save.
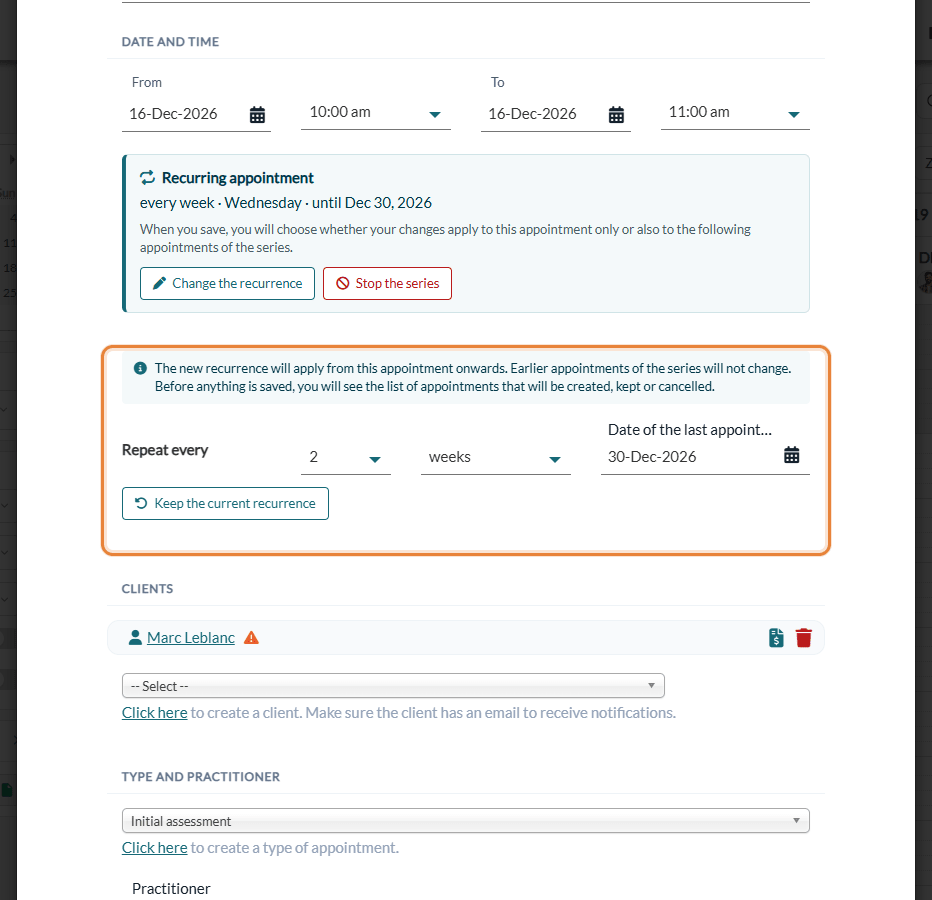
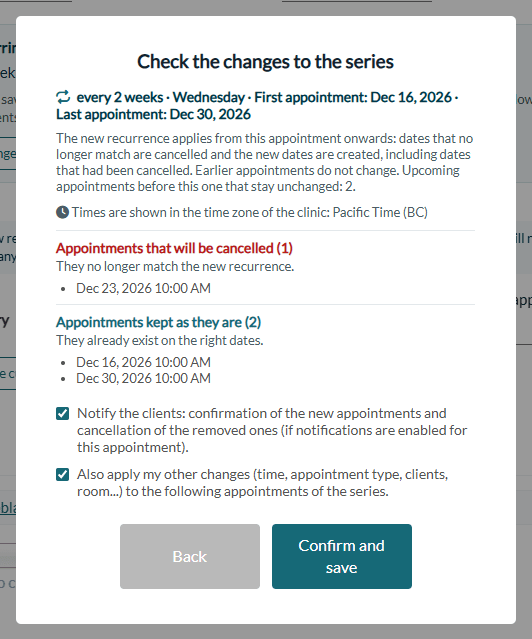
The new recurrence applies from the appointment you opened. The series is split in two: the earlier appointments (past or upcoming) keep the old recurrence and do not change, and a new series starts with the opened appointment. Dates that no longer match are cancelled, and the new dates are created, including dates that had been cancelled before.
If you also changed other details (time, type, clients, room...), the window offers Also apply my other changes to the following appointments of the series.
Change the date of the last appointment
- Open any appointment of the series and click Change the recurrence.
- Change the Date of the last appointment: later to extend the series, earlier to shorten it.
- Click Save, check the window, then click Confirm and save.
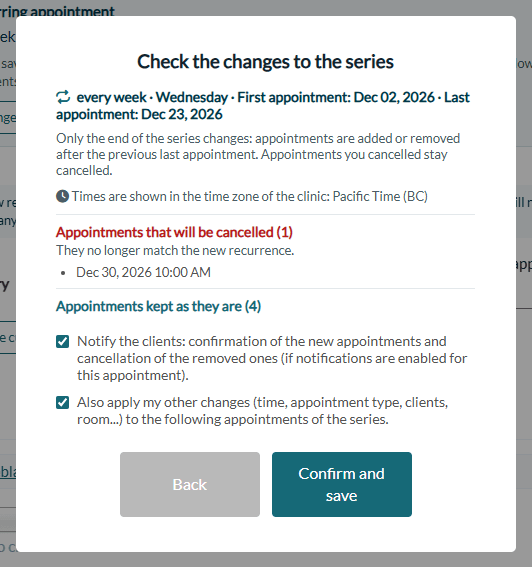
Only the end of the series changes: appointments are added after the previous last appointment, or cancelled after the new one. Appointments you had cancelled stay cancelled.
Stop the series
- Open the first appointment to remove (for example the next one).
- Click Stop the series on the Recurring appointment card.
- Confirm with Stop the series (or Back to keep everything).
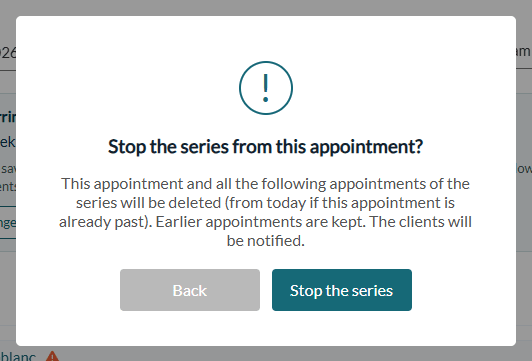
Important: this appointment and all the following appointments of the series are deleted (from today if the opened appointment is already past). Earlier appointments are kept. This cannot be undone. To delete the whole series, open its first upcoming appointment.
Cancel or delete several future appointments at once
| You want to... | Do this |
|---|---|
| Delete all the appointments from a given date | Open the appointment of that date and click Stop the series. The appointments are deleted. |
| End the series earlier but keep a trace of the removed appointments | Move the Date of the last appointment earlier. The appointments after it are cancelled (they stay visible with the cancelled status). |
| Remove a single date (holiday, absence) | Open that appointment and cancel or delete it like any other appointment: the rest of the series does not change. |
What are your clients notified of?
- New series — if Notify the clients is checked and the initial notification is turned on for the appointment, each appointment of the series is confirmed. With Send confirmation notifications for recurring appointments immediately (Settings > Scheduler, www.colib.io/settings?show=scheduler), all the confirmations are sent right away; otherwise each confirmation is sent just after the end of the previous appointment of the series. Reminders work as for any appointment.
- New frequency or new end date — if Notify the clients is checked, the clients receive the confirmation of the new appointments and a cancellation notice for the removed ones (only if notifications are enabled for the appointment).
- This appointment and the following ones — the appointments that change get an updated confirmation and their reminders are rescheduled, according to the notification options of the appointment. If you changed the time of the opened appointment, Colib also asks whether to notify the clients of that change.
- Stop the series — the clients are notified that the deleted appointments are cancelled, if they had received the confirmation of those appointments.
To learn more about confirmations and reminders, see What notifications do clients receive after booking?
Good to know
- Each appointment stays independent — you can still open any appointment of the series to change its status, write a note, create an invoice, cancel it or delete it (More actions > Delete appointment/event), like a regular appointment.
- Cancelled appointment — the series cannot be changed from a cancelled appointment: open another appointment of the series.
- Series being updated — while Colib creates or updates the appointments of a series, they cannot be saved again: wait a few seconds, then try again.
- Block time — the same Repeat this appointment button works for busy time and other events: see How can I block time on my scheduler?
- Delete one appointment — see How to delete an appointment?
Still have a question?
Write to us at support@colib.io, we will be happy to help.
Was this article helpful?
That’s Great!
Thank you for your feedback
Sorry! We couldn't be helpful
Thank you for your feedback
Feedback sent
We appreciate your effort and will try to fix the article