Who is this article for?
You work with other practitioners, a receptionist or an assistant? Invite them to your Colib practice: each person gets their own account, with the rights you choose. This article explains how to send the invitation and how to follow it until the person signs in.
Before you start: you need the Administrator role with the option Ability to edit team members’ details and permissions. On the Starter plan, you can invite staff members but not other practitioners (see How does payment for Colib plans work?).
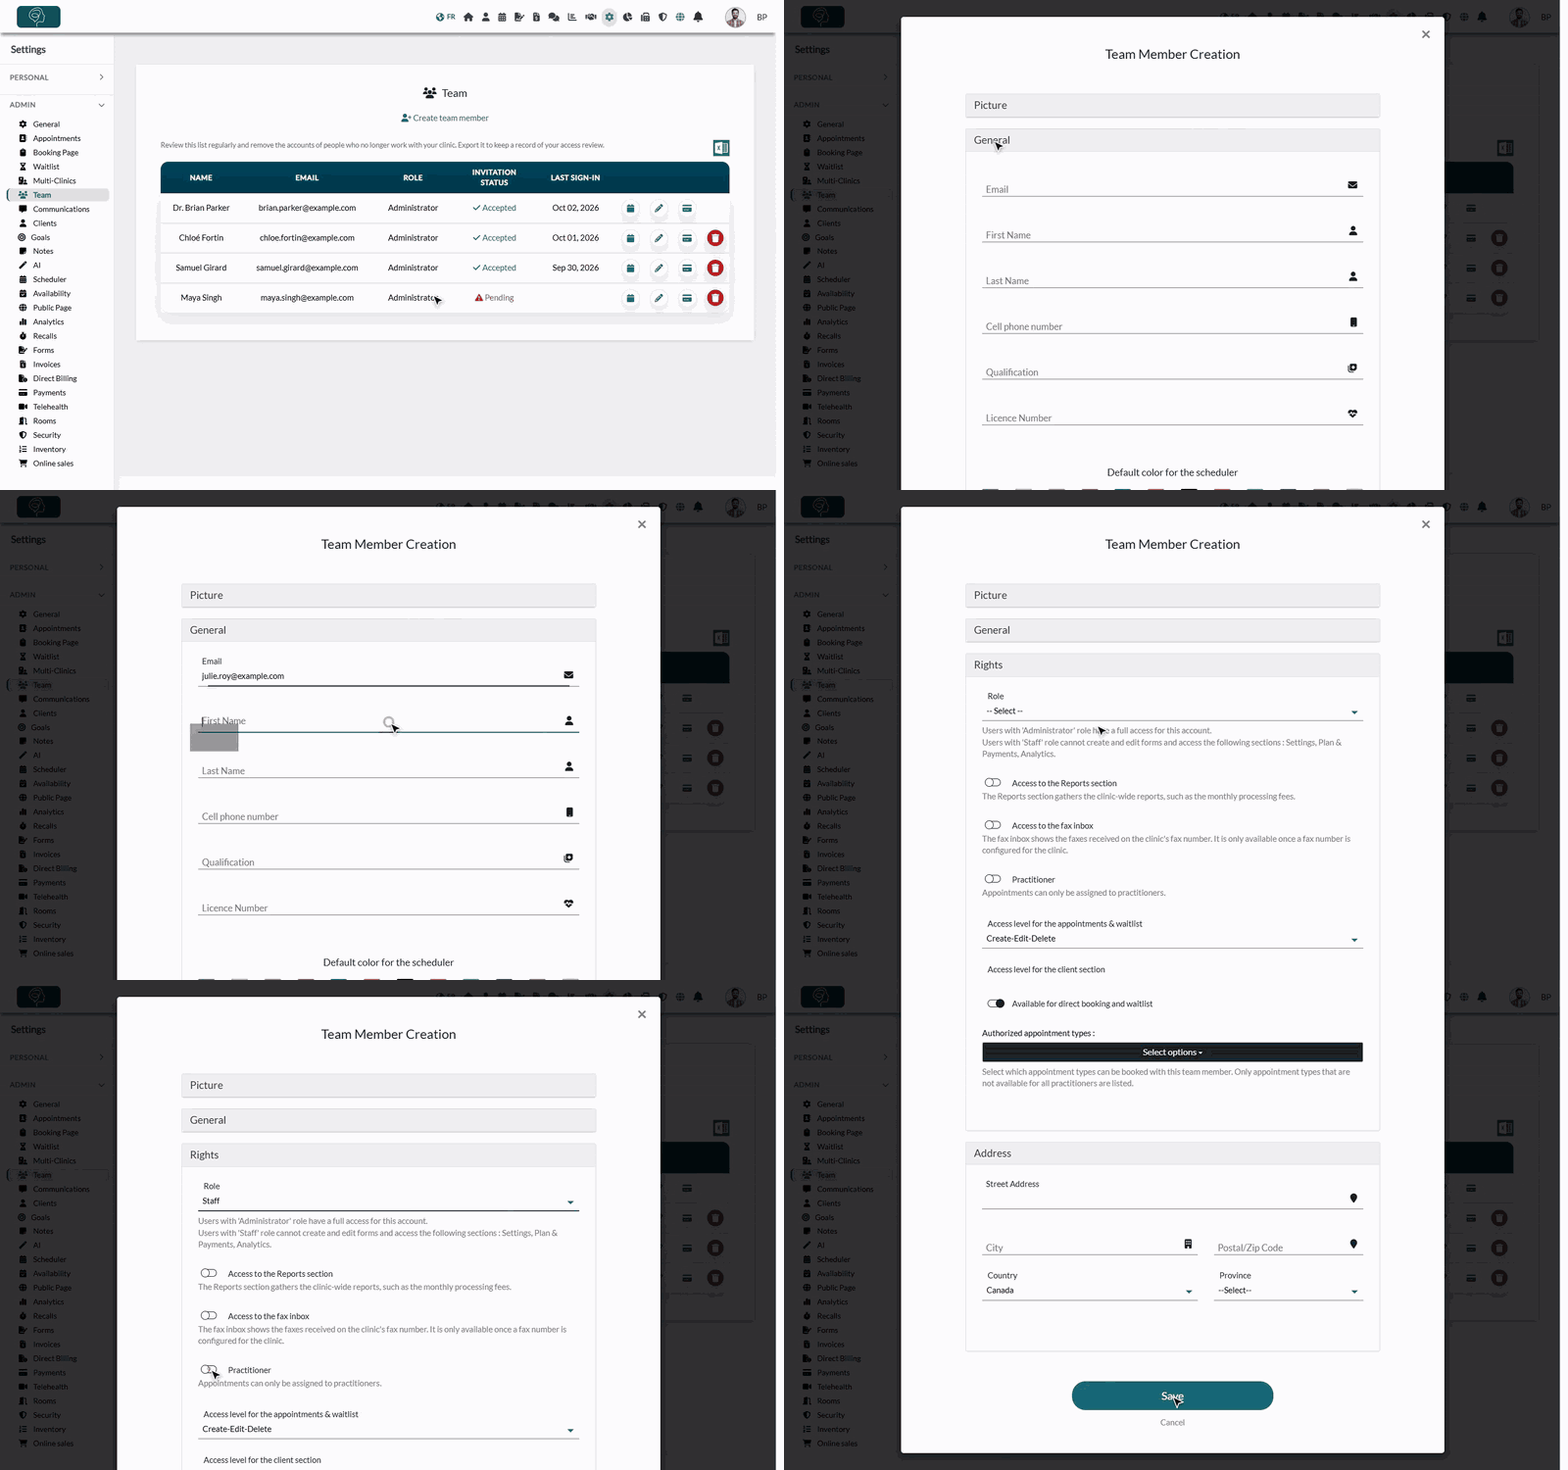
1Open the Team settings
- Go to www.colib.io/settings?show=team. You can also click the Settings icon (gear) in the top bar, then Team in the Admin menu on the left.
- Click Create team member. The Team Member Creation window opens.
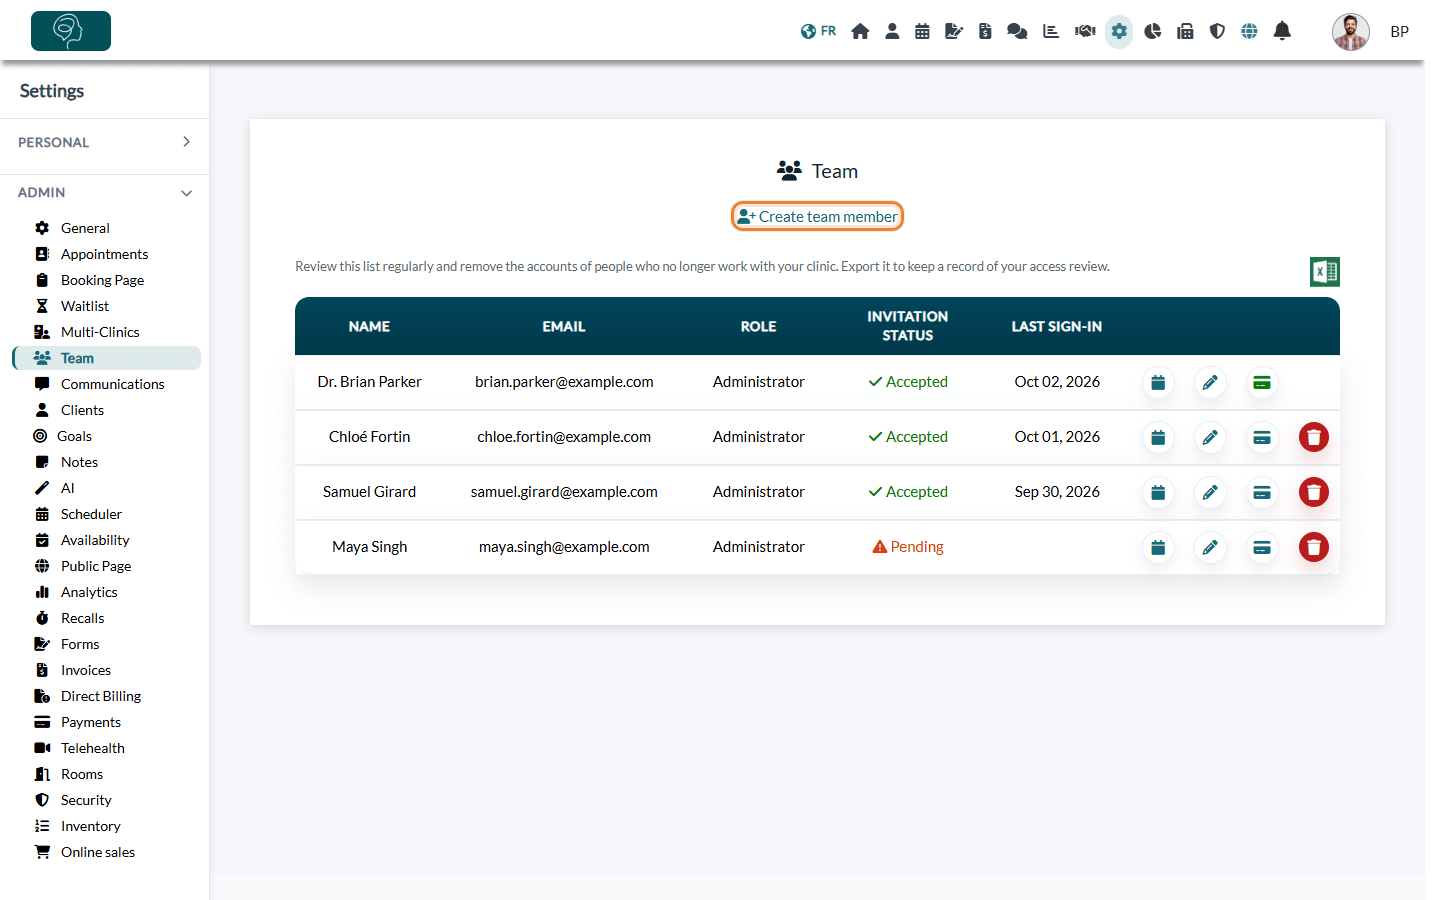
2Enter the person's details
- Open the General section.
- Enter the Email address of the person: the invitation is sent to it, and it becomes their username. It cannot be changed in this window once the member is created.
- Enter the First Name and the Last Name (required), and optionally the Cell phone number.
- For a practitioner, you can also fill in the qualification, the licence number, the description shown on your booking page and the default color of their appointments in the scheduler. The Picture section adds a profile photo.
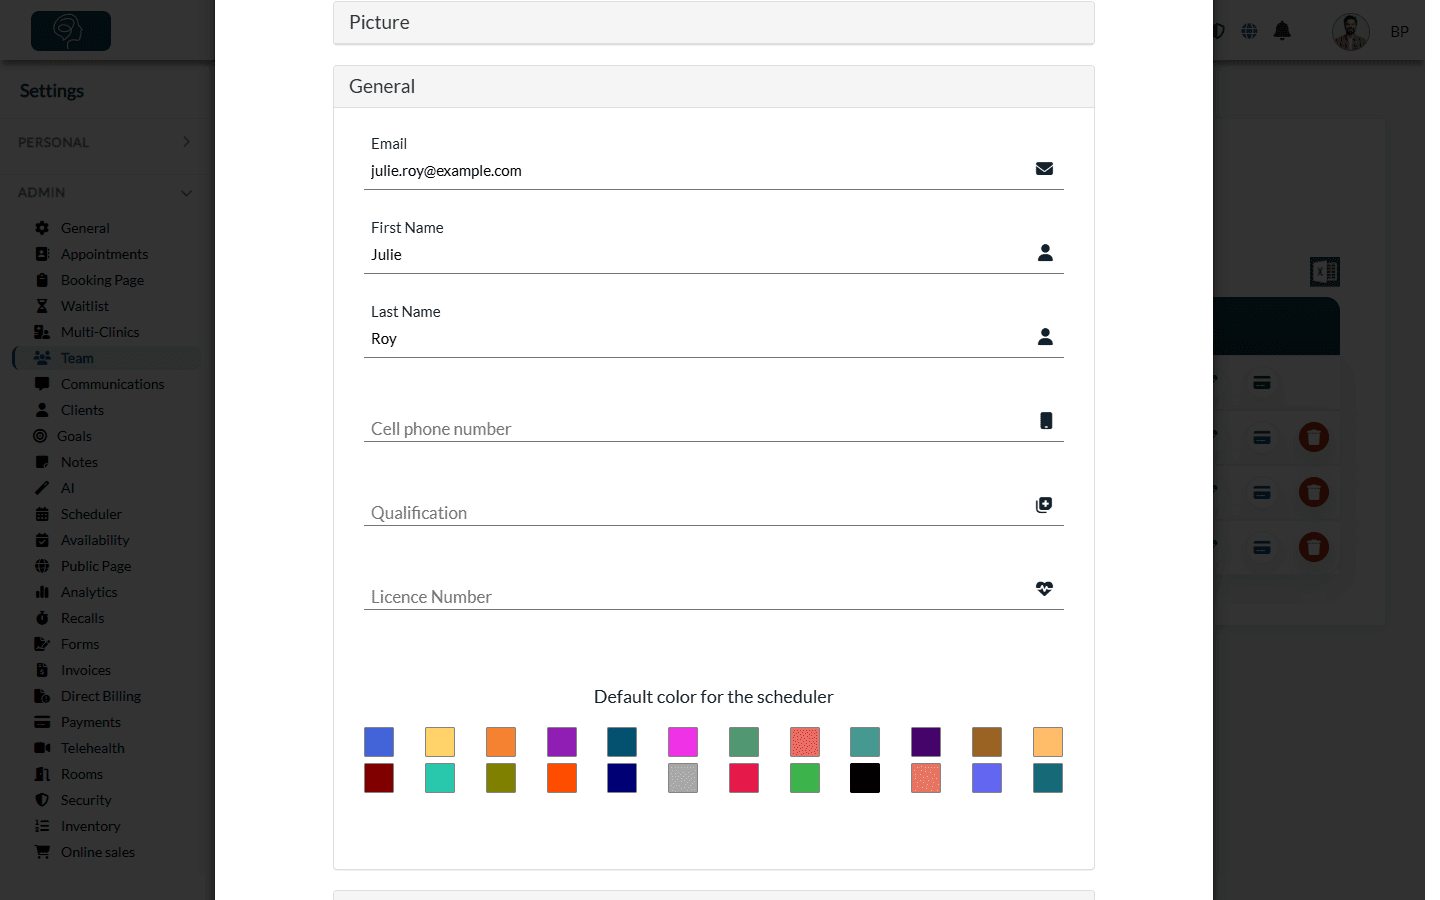
3Choose the role and the rights
- Open the Rights section and choose the Role:
- Administrator: full access to the account, including the settings and the plan.
- Staff: no access to Settings, Plan & Payments and Analytics, and cannot create or edit forms.
- Turn on Practitioner if the person sees clients: only practitioners can be assigned appointments. Leave it off for a receptionist or an assistant.
- Adjust the access levels (appointments, clients, documents, financial information, forms, notes, audit log) and the other options if needed. Each one is explained in What are the different levels of rights options for the members of my practice?
- If your practice has several clinics, select the Clinics associated with this person.
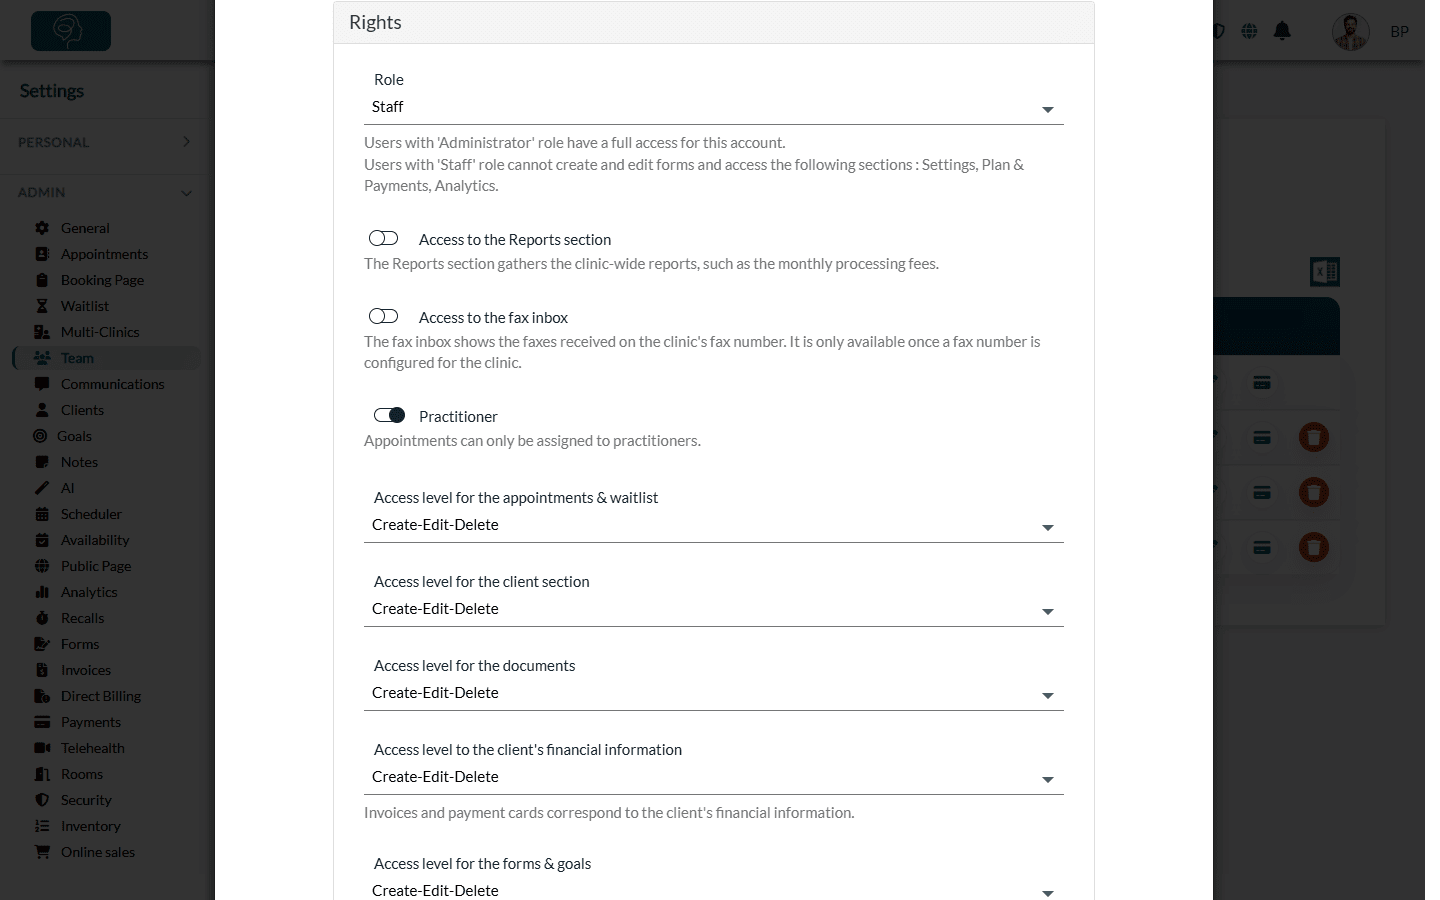
The Security, Booking and Address sections are optional: you can fill them in now or later. The practitioner's availability can be set once the member is created.
4Send the invitation
- Click Save at the bottom of the window. The message The invitation has been sent. confirms the creation.
- The person receives an email Welcome to Colib.io telling them that your practice invited them. They click Continue in the email to confirm their address and choose their password, then they can sign in.
5Follow the invitation
The Invitation Status column of the team list shows where each invitation stands:
- Pending: the person has not accepted the invitation sent by email yet.
- Accepted: the person has confirmed their email address and can use Colib. The Last sign-in column then shows the date of their last sign-in.
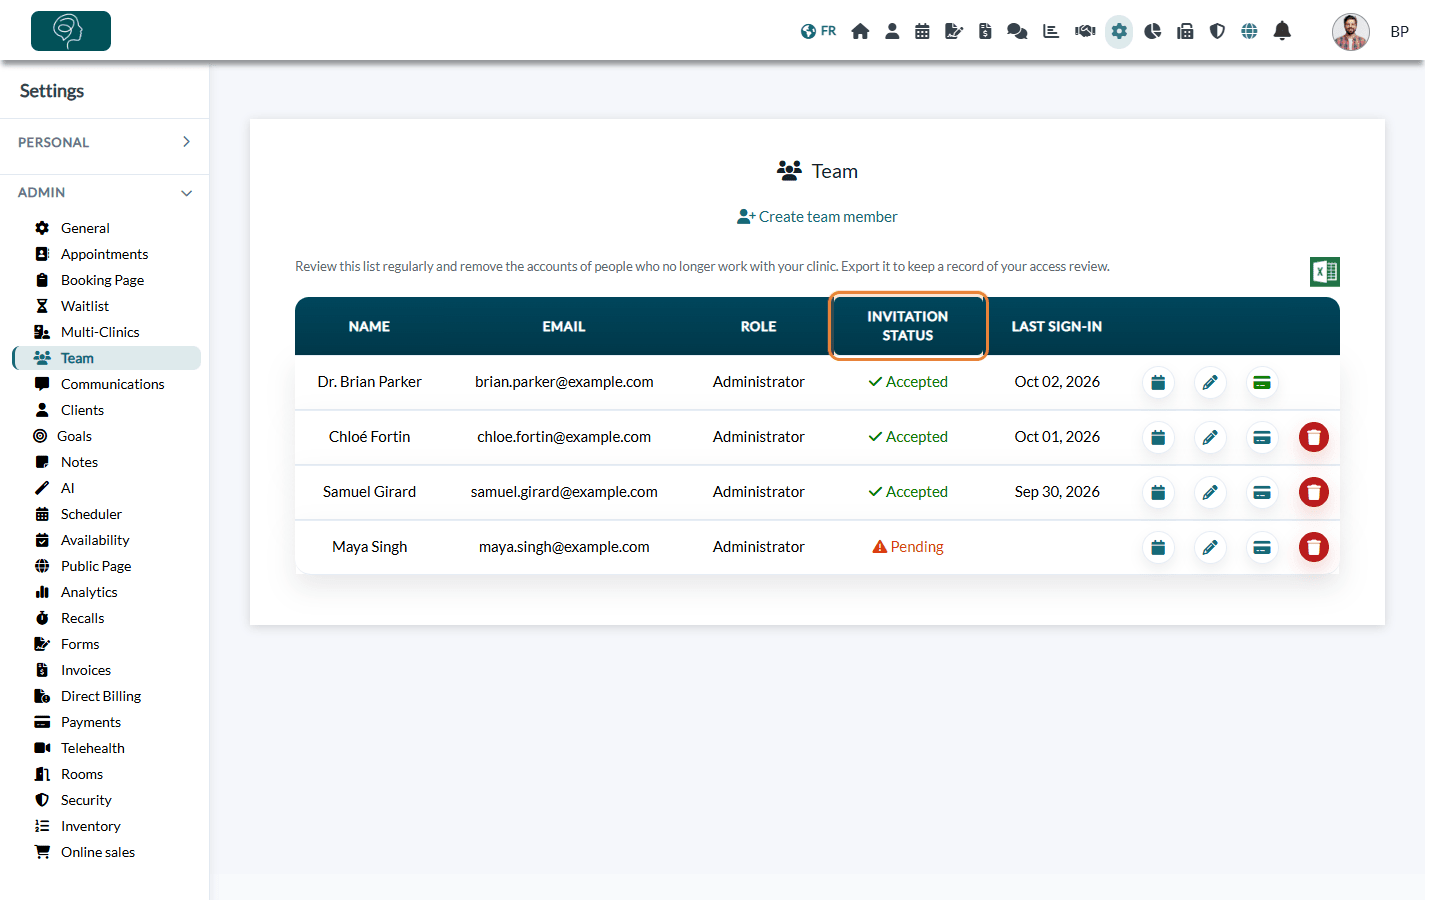
If the invitation stays Pending, ask the person to check their junk mail folder. If they have still not accepted it a few days later, Colib automatically sends them a reminder email. There is no button to send the invitation again, but the person can get a new link on their own: on the Colib sign-in page, they click Forgot your password? and enter the email address you invited. Write to us if they still cannot find it.
One email address per person
In Colib, the email address is the username of each team member. It must be unique: two people cannot share the same address, and the same address cannot be used for two members, even within your own practice. If you try, Colib shows Sorry, this user is already attached to a business.
Shared mailbox? Do not invite several employees with a shared address (for example a reception mailbox). Give each person their own address: each one then has their own password, their own rights, and their actions are recorded under their name in the audit log.
Practitioner or administrator: who needs a licence?
The Role and the Practitioner option are two separate settings:
| Setting | What it controls | Effect on your bill |
|---|---|---|
| Role (Administrator or Staff) | What the person can access: an administrator has access to Settings, Plan & Payments and Analytics. | None. |
| Practitioner option | Whether the person can be assigned appointments. | This is what counts for the licences. |
- An administrator can also be a practitioner, and a staff member can be a practitioner too: choose both settings according to the person's job.
- On the Practitioner and Practice Pro plans, the price of the plan covers one practitioner (the one who had the most appointments in the month). Each other member marked Practitioner adds a licence, even with no appointments, and so does anyone who had appointments during the billing period, even if they have been removed from the team since.
- A receptionist or an assistant created as Administrator or Staff, without the Practitioner option and without appointments, does not add a licence.
- On the Starter plan, you cannot add another practitioner: Colib shows Your current plan does not support adding practitioners to your clinic. Staff members can still be invited.
- The licences appear on your monthly Colib invoice, in the Billing tab (www.colib.io/planandpayments?show=billing). The prices are explained in How does payment for Colib plans work?
Good to know
- One practice per account — an email address already used by a member of another practice cannot be invited: Colib shows Sorry, this user is already attached to a business. Ask the person to use another email address.
- Existing Colib account — if the person already has a Colib account that is not linked to any practice, it is added to your team directly.
- Language of the invitation — the invitation email is written in the language of Colib when you create the member.
- Plan — on the Practitioner and Practice Pro plans, each additional practitioner adds a licence to your monthly bill. Staff members who are not practitioners do not.
- Edit or remove a member — use the pencil and trash icons on their row. Before removing a practitioner, reassign their clients and appointments: they are kept, but you will no longer see that member's appointments in the scheduler.
- Review the list regularly — the No sign-in for 90 days badge points out accounts that may belong to people who no longer work with you. The Excel icon exports the list.
- What practitioners see — to limit a practitioner to their own clients, see Assigning practitioners and configuring client visibility.
Still have a question?
Write to us at support@colib.io, we will be happy to help.
Was this article helpful?
That’s Great!
Thank you for your feedback
Sorry! We couldn't be helpful
Thank you for your feedback
Feedback sent
We appreciate your effort and will try to fix the article