Who is this article for?
You want a client to fill out and sign a form (consent, intake questionnaire...) from home, without creating an account or remembering a password. Or you want a client to sign a form on a tablet at your front desk.
Good news: this is how Colib forms work by default. The client simply opens the link of the form: the page asks for no sign-in. This article explains how to set up the signature, how to send the form, what the client sees, and the only option that requires a client portal account.
Before you start: the form must exist in your Templates (www.colib.io/forms). To send it by email, the client must have an email address in their record.
1Add the electronic signature to the form
- Go to www.colib.io/forms and click the pencil icon on the card of the form.
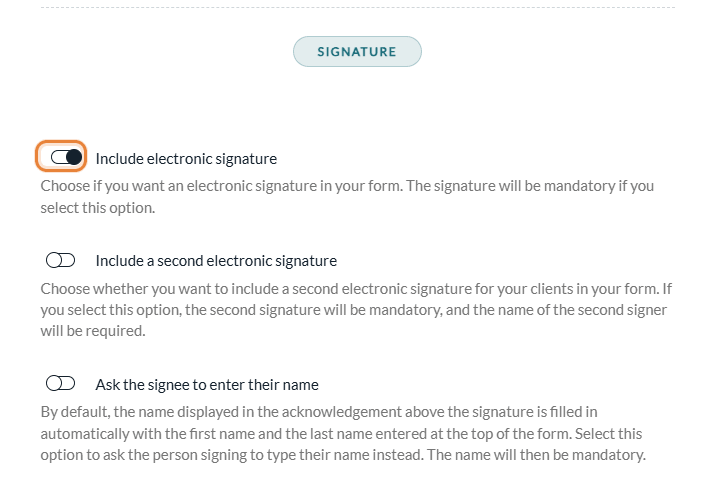
- In the General tab, scroll down to the Signature section.
- Turn on Include electronic signature. The signature then becomes mandatory to submit the form.
- Optionally:
- Include a second electronic signature — for a second signer (for example, the second parent). The second signature and the name of the second signer are then mandatory.
- Ask the signee to enter their name — by default, the name shown above the signature is the first and last name entered at the top of the form. With this option, the person who signs types their own name (useful when a parent signs for a child).
- Save the form.
More details on the form editor: How can I build a new form from scratch? and How to edit an existing form
2Send the form to the client
To have the completed form linked to the right client record, send it from Colib by email:
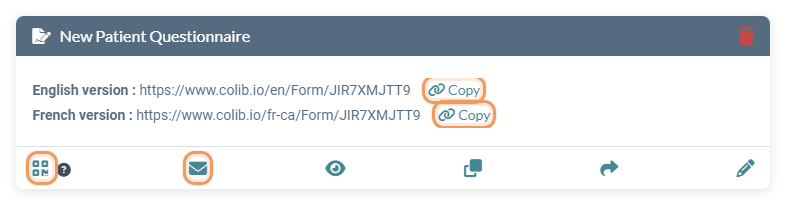
- from the card of the form, with the envelope icon (Send via email);
- or from the client record, in the Forms tab, with Send a form via email.
The email contains a link that is personal to this client. When the client opens it, Colib already knows who they are: their first and last name are filled in, and the status of the form changes to Form Opened. All the sending options (scheduled sending, automatic sending before an appointment, reminders) are explained in How can I send the form to my clients?
3What the client sees
- The client clicks the link in the email. The form opens in the browser of their phone, tablet or computer, with no sign-in and nothing to install.
- They check their First Name and Last Name and answer the questions.
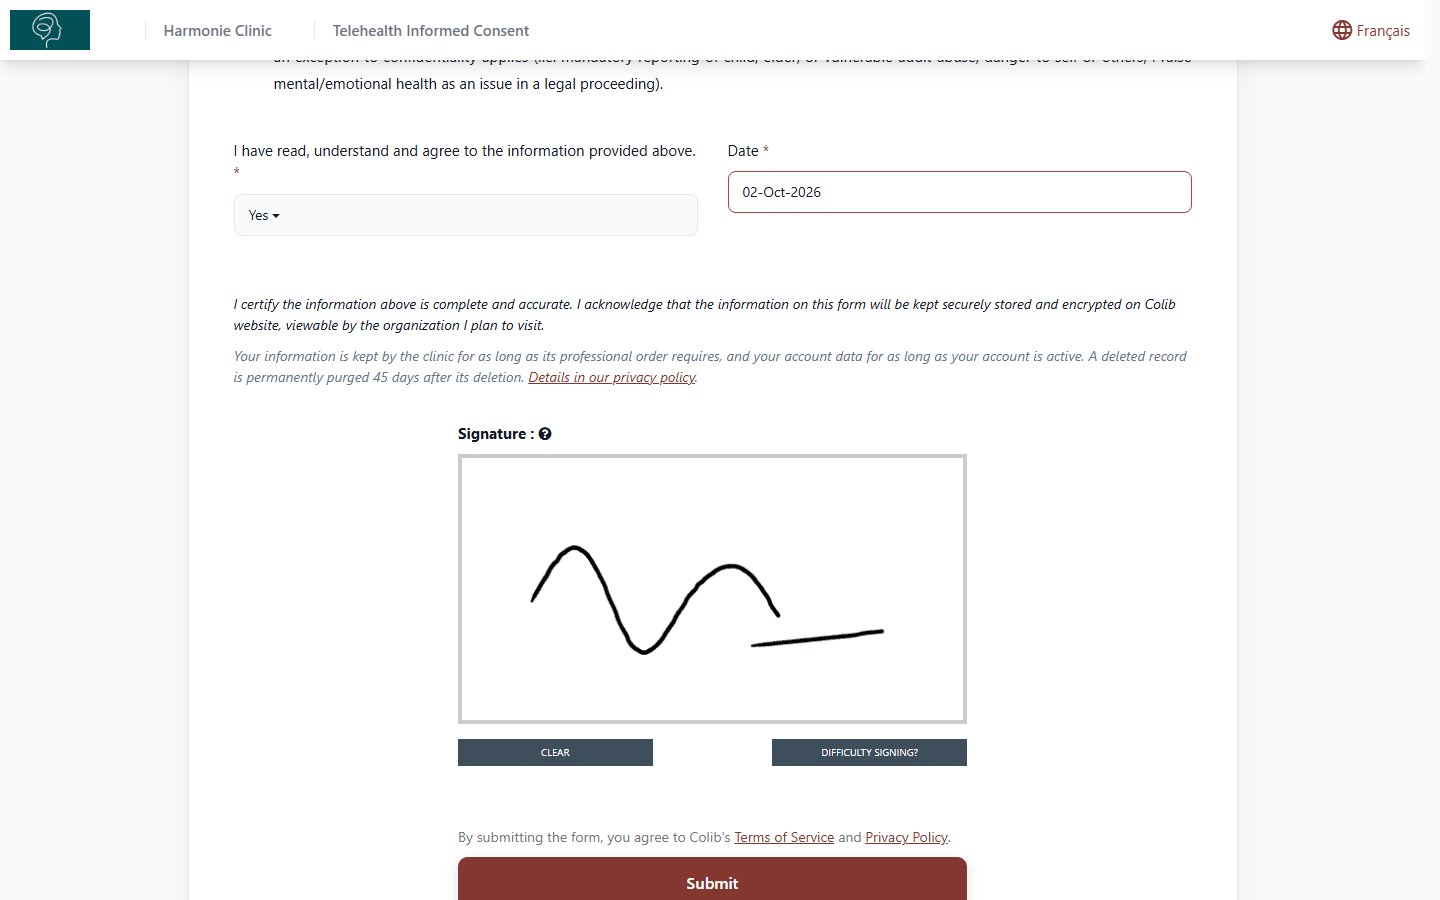
- They sign in the white box: with a finger on a phone or a tablet, with the mouse on a computer. Clear erases the signature. Difficulty Signing? creates a signature from the first and last name entered, after a confirmation.
- They click Submit. A confirmation page appears (by default: Thanks for completing the form.). You can change this text in the Post-Submission Pages tab of the form.
Important: the personal link can be used only once. If the client opens it again after submitting, they get a blank form that is no longer linked to their record, and a new submission creates a separate form. To have a form filled out again, send it again from Colib.
4Have a form signed at the office, on a tablet
Colib has no "fill out now" button in the client record. To have a client sign a form at your front desk:
- On the card of the form (www.colib.io/forms), click Copy next to the English or French version of the link, and open this link on the tablet. You can also display the QR code (QR code icon, Download QR Code) so that the client scans it with their own phone.
- Hand the tablet to the client: they enter their first and last name, answer, sign and click Submit.
- The link stays valid: the next client can use it on the same tablet. After a submission, the confirmation page offers Complete a new form.
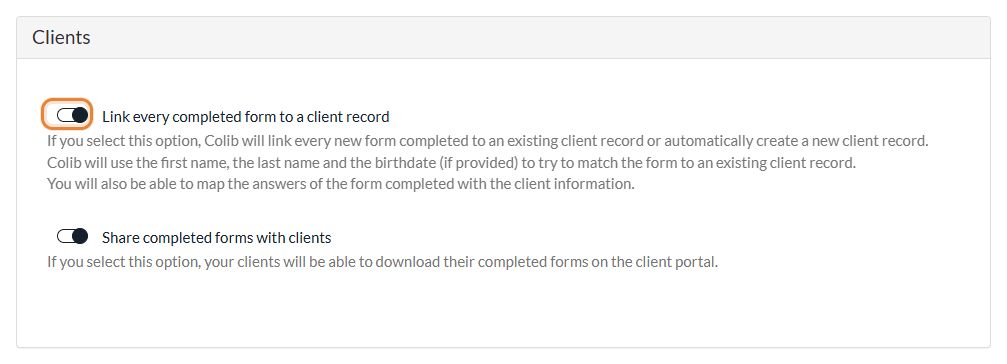
This general link is not tied to a client. To have every completed form attached to a client record automatically, go to Settings > Forms (www.colib.io/settings?show=signature) and turn on Link every completed form to a client record in the Clients section. Colib then looks for an existing client with the first name, the last name and, when the form asks for it, the date of birth or the email; if none matches, it creates a new client record.
Optional: require a client portal account
For a given form, you can decide that the client must have a client portal account before filling it out. In the General tab of the form, turn on Require a client portal account to fill out this form, then save.

- The option only applies to the personal links sent by email from Colib. The general link and the QR code never ask for an account.
- A client who does not have an account yet sees the Account required page. They enter their email, receive an email with a link to create their account, and are then brought back to the form.
- A client who already has an account fills out the form directly from the link.
Leave this option off if you want your clients to sign without any account.
Good to know
- Find the signed form — completed forms appear in Results (www.colib.io/forms?show=results) and in the Forms tab of the client record, with their PDF. See How do I see forms results?
- Countersignature — if your practice must also sign the form, see How to countersign a form?
- A copy for the client — with Share completed forms with clients (Settings > Forms), the confirmation page invites the client to download the completed form from the client portal.
- Several clinics — if your practice has several clinics, check that the form is associated with the client's clinic before sending it. See How do Colib forms work for multiple locations?
- Sign an existing Word or PDF document — turn it into a Colib form first: How can I transform my PDF or Word form into an online form with Colib?
Still have a question?
Write to us at support@colib.io, we will be happy to help.
Was this article helpful?
That’s Great!
Thank you for your feedback
Sorry! We couldn't be helpful
Thank you for your feedback
Feedback sent
We appreciate your effort and will try to fix the article