Who is this article for?
This article walks you through the setup of your client booking in Colib: choosing how clients book, configuring your online booking page section by section, making your appointment types bookable and defining your availability. Follow it when you start with Colib or when you want to review your booking page.
Before you start: the booking settings are in Settings > Booking Page (www.colib.io/settings?show=bookingpage). You need access to the practice settings to change them. Not sure which option to choose? Read the booking options offered by Colib first.
1Choose the booking type
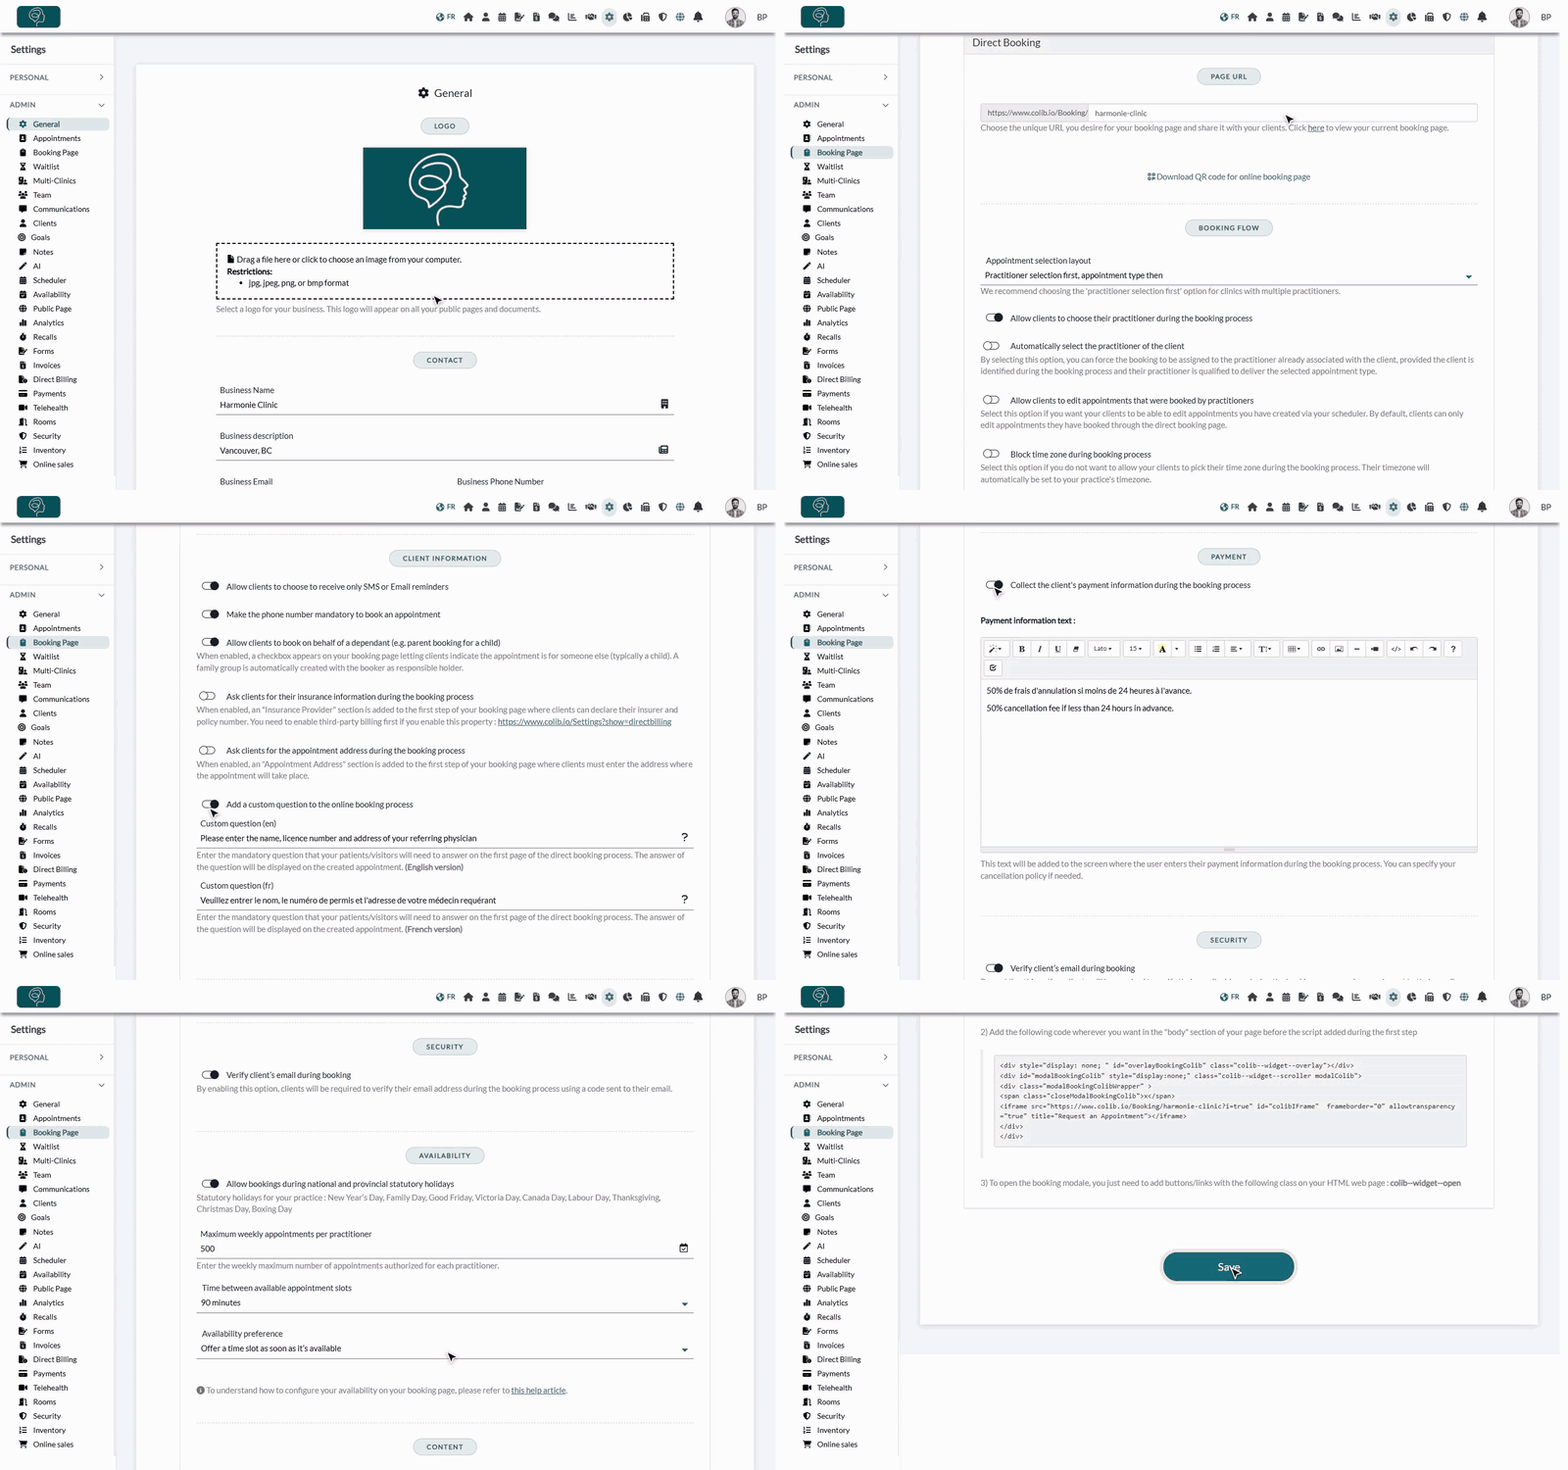
- Go to www.colib.io/settings?show=bookingpage. You can also click the Settings icon (gear) in the top bar, then Booking Page in the Admin menu on the left.
- In the Booking Type section, choose the Client booking type: Online booking by client, Appointment request form or None.
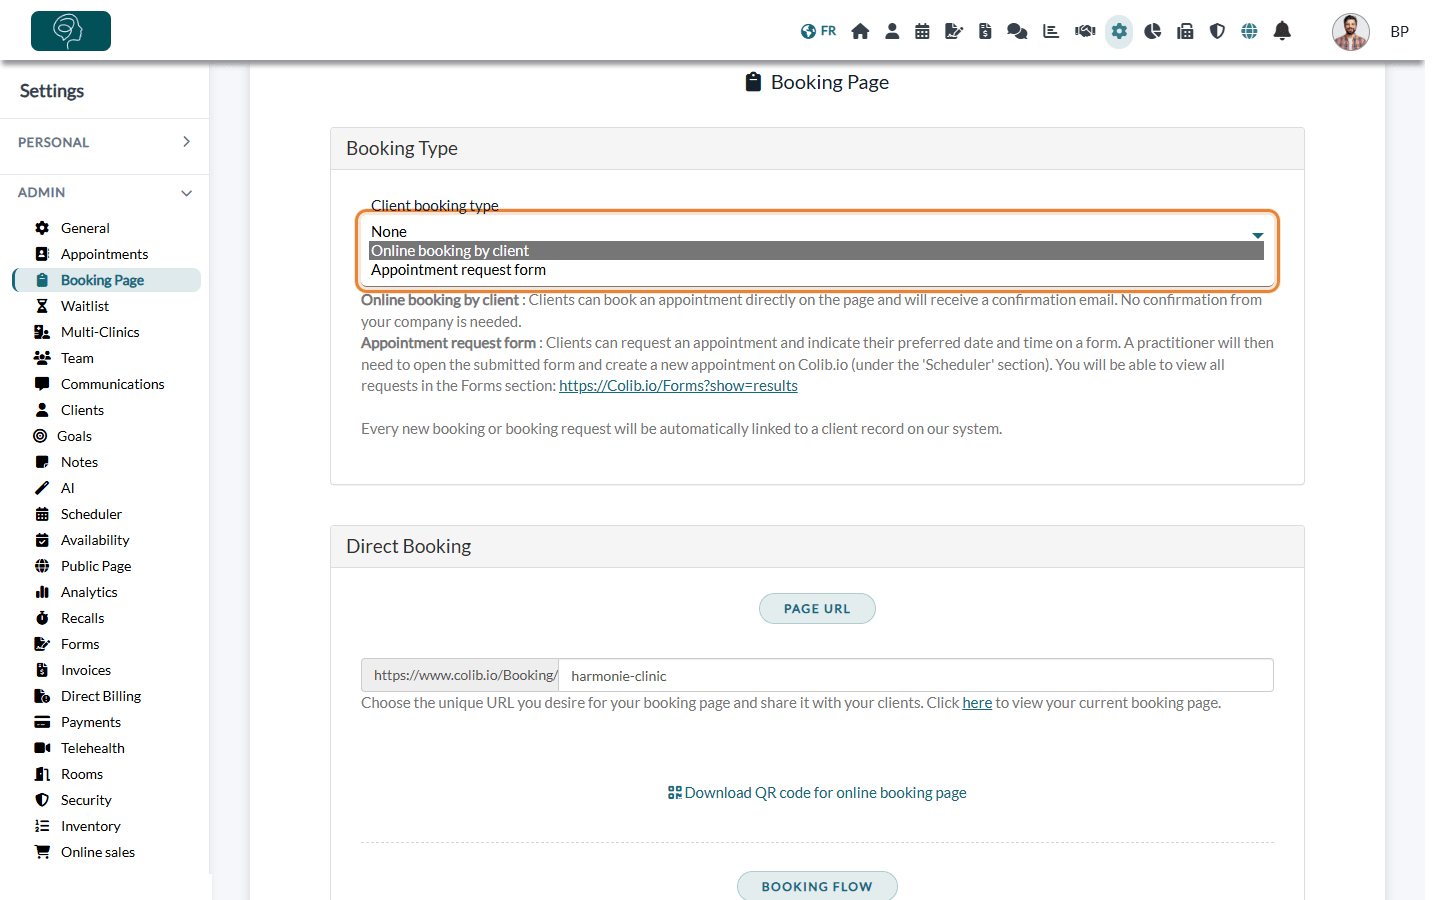
Important: the booking type is saved as soon as you change it in the list: your booking page changes immediately for your clients.
You can also choose None, but we recommend one of the two main methods (Online booking by client or Appointment request form): they automate the creation and update of your client records.
2If you chose the appointment request form
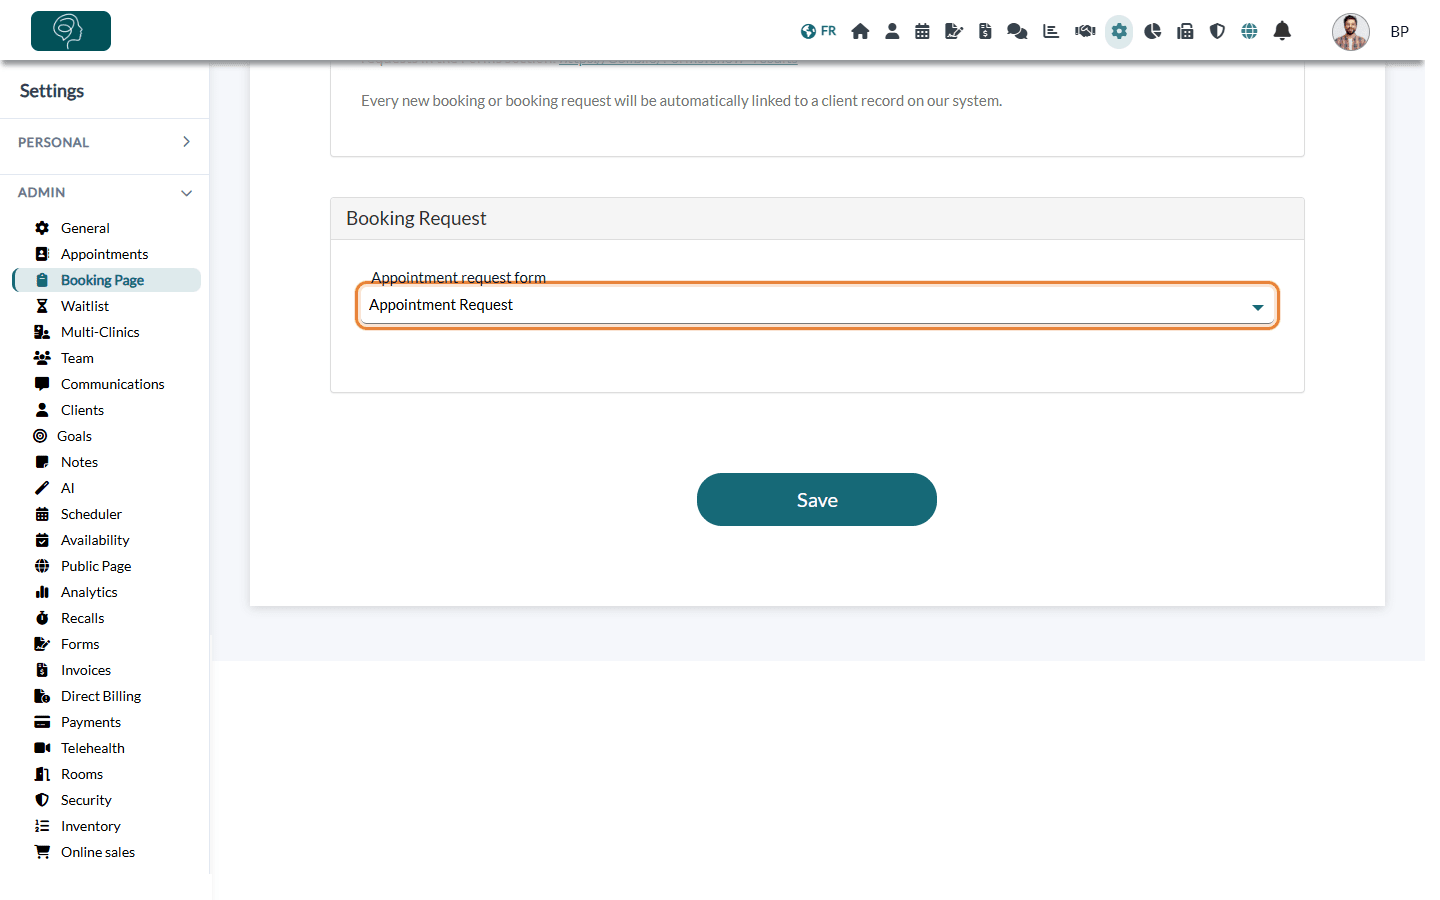
- In the Booking Request section, choose in Appointment request form the form your clients will fill in.
- Click Save at the bottom of the page.
- Requests sent by your clients appear in the Forms section (www.colib.io/forms?show=results). Open each request, then create the appointment in your scheduler.
3If you chose online booking: configure your booking page
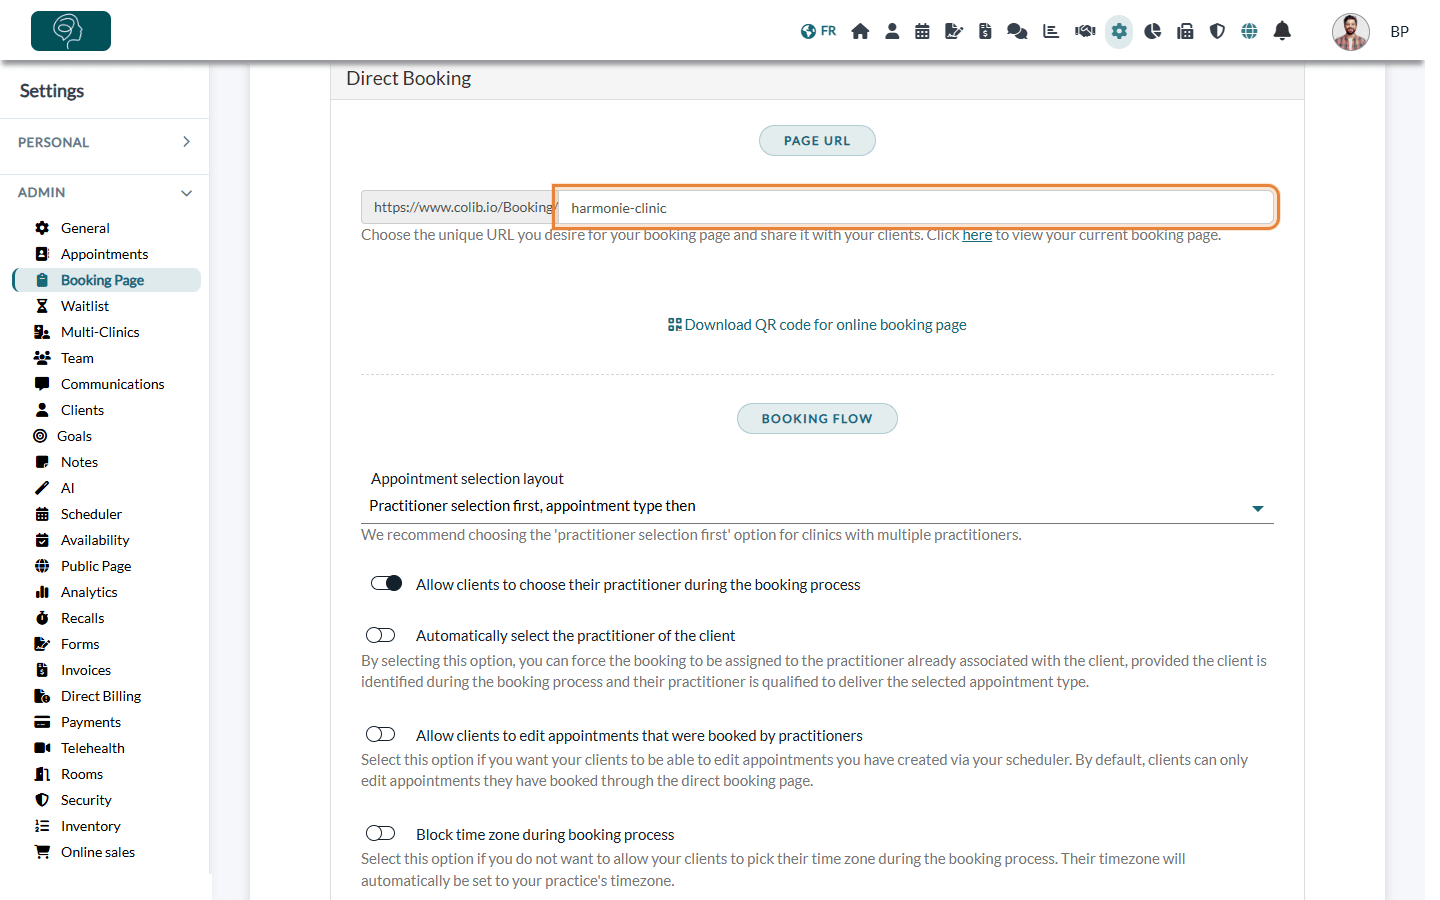
The Direct Booking section contains all the options of your booking page. The table below summarizes them; set the ones you need, then click Save at the bottom of the page.
| Part | What you can set |
|---|---|
| Page URL | The address of your booking page (https://www.colib.io/Booking/ followed by the name you choose), a link to view it, and Download QR code for online booking page. |
| Booking flow | Appointment selection layout: practitioner first or appointment type first (practitioner first is recommended for clinics with several practitioners). Allow clients to choose their practitioner during the booking process. Automatically select the practitioner of the client when the client is recognized. Allow clients to edit appointments that were booked by practitioners (see this article). Block time zone during booking process to always use your practice's time zone. |
| Notifications | Receive an email notification for each appointment booked, cancelled or updated by the client, in addition to the Colib notification. |
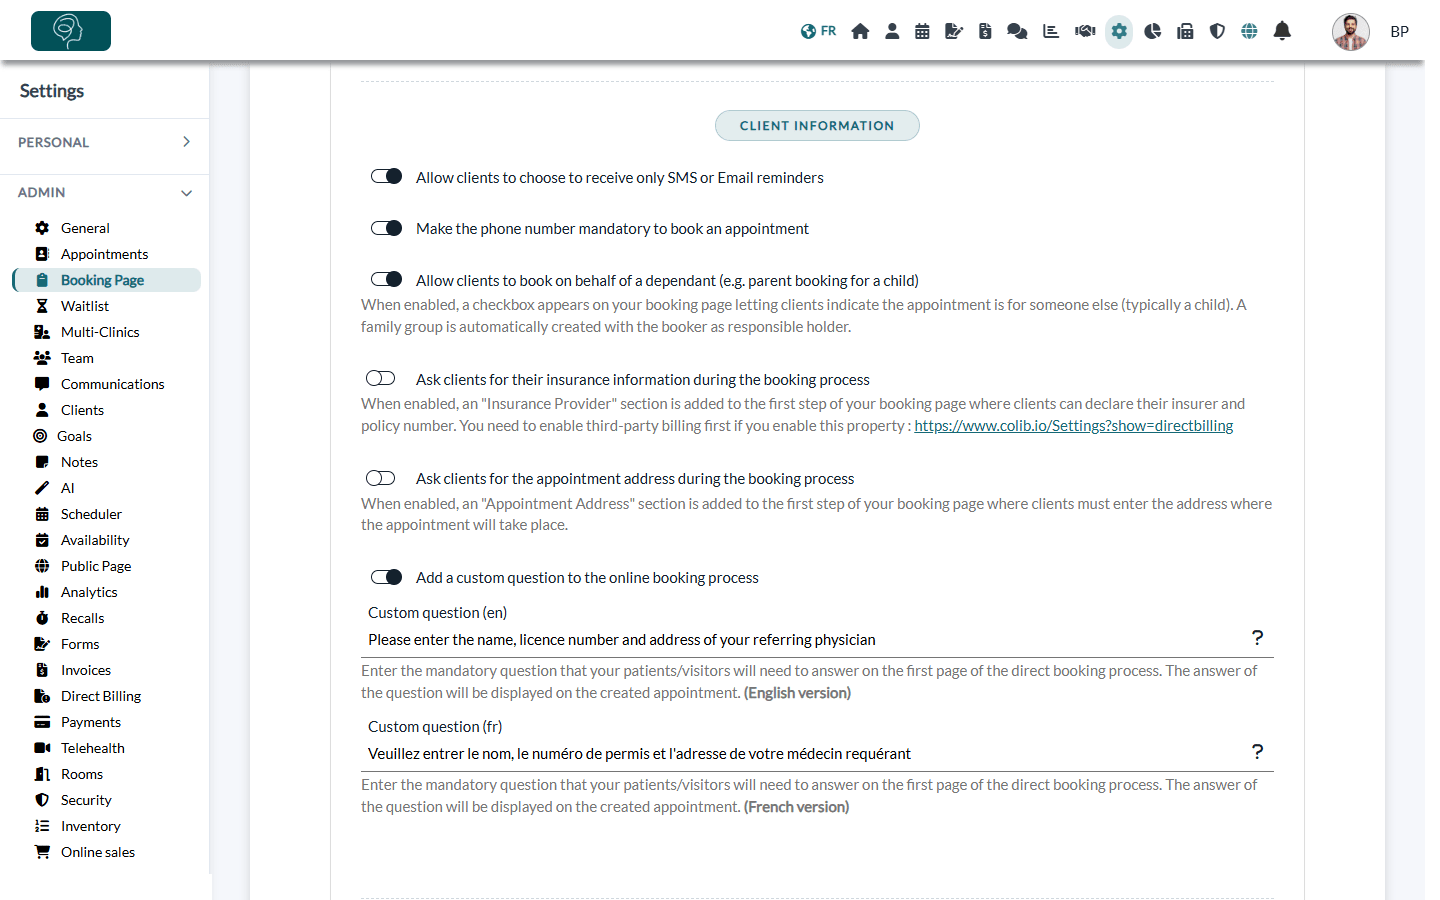
| Client information | Let clients choose SMS or email reminders, make the phone number mandatory, allow bookings for a dependant (see this article), ask for insurance information or for the appointment address (with an optional maximum distance from the practitioner), and add a mandatory custom question in English and French. |
| Additional client fields | Show your own client fields on the first step and make them mandatory: see how to add custom fields to your client records. |
| Payment | Collect the client's payment information during the booking process and the Payment information text shown on that step: see how to charge clients automatically during online booking. |
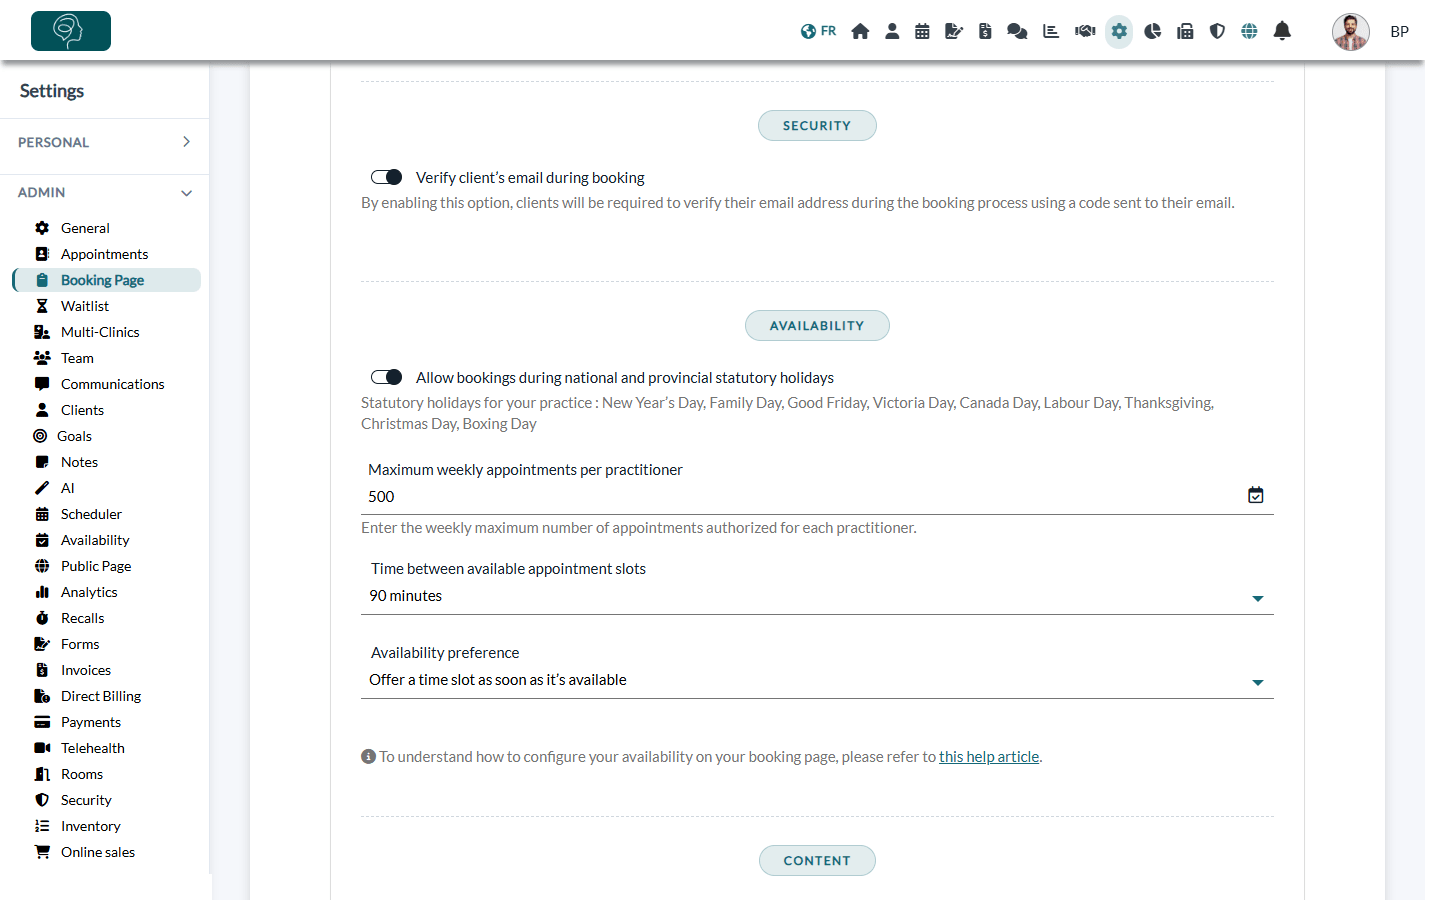
| Security | Verify client’s email during booking with a code sent by email: see this article. |
| Availability | Allow bookings during national and provincial statutory holidays, Maximum weekly appointments per practitioner, Time between available appointment slots (see time intervals) and Availability preference. |
| Content | Pre-booking texts (first screen) and post-booking texts (confirmation screen), in English and French. |
| Cancellation policy | Your cancellation policy and terms, in English and French, shown on the last step just above the booking button. Leave both fields empty to show nothing. |
| SEO | The title and description of your booking page used by search engines, in English and French. |
| Widget integration | The code to add a booking window to your website: see how to embed your booking page on your website. |
4Make your appointment types bookable
Only the appointment types marked as bookable are offered online. In Settings > Appointments (www.colib.io/settings?show=appointments), open each type and, in its Direct booking section:
- turn on Available for client booking and waitlist;
- set the minimum notice and the maximum advance of bookings: see how to control how far in advance clients can book;
- if you use availability groups, add the type to at least one group: see availability groups.
5Define your availability
Clients can only book when you are available. The practice opening hours are set in Settings > General (www.colib.io/settings?show=general), in the Opening Hours part. Each practitioner then completes their own options in Settings > Personal > Availability (www.colib.io/settings?show=personalscheduler):
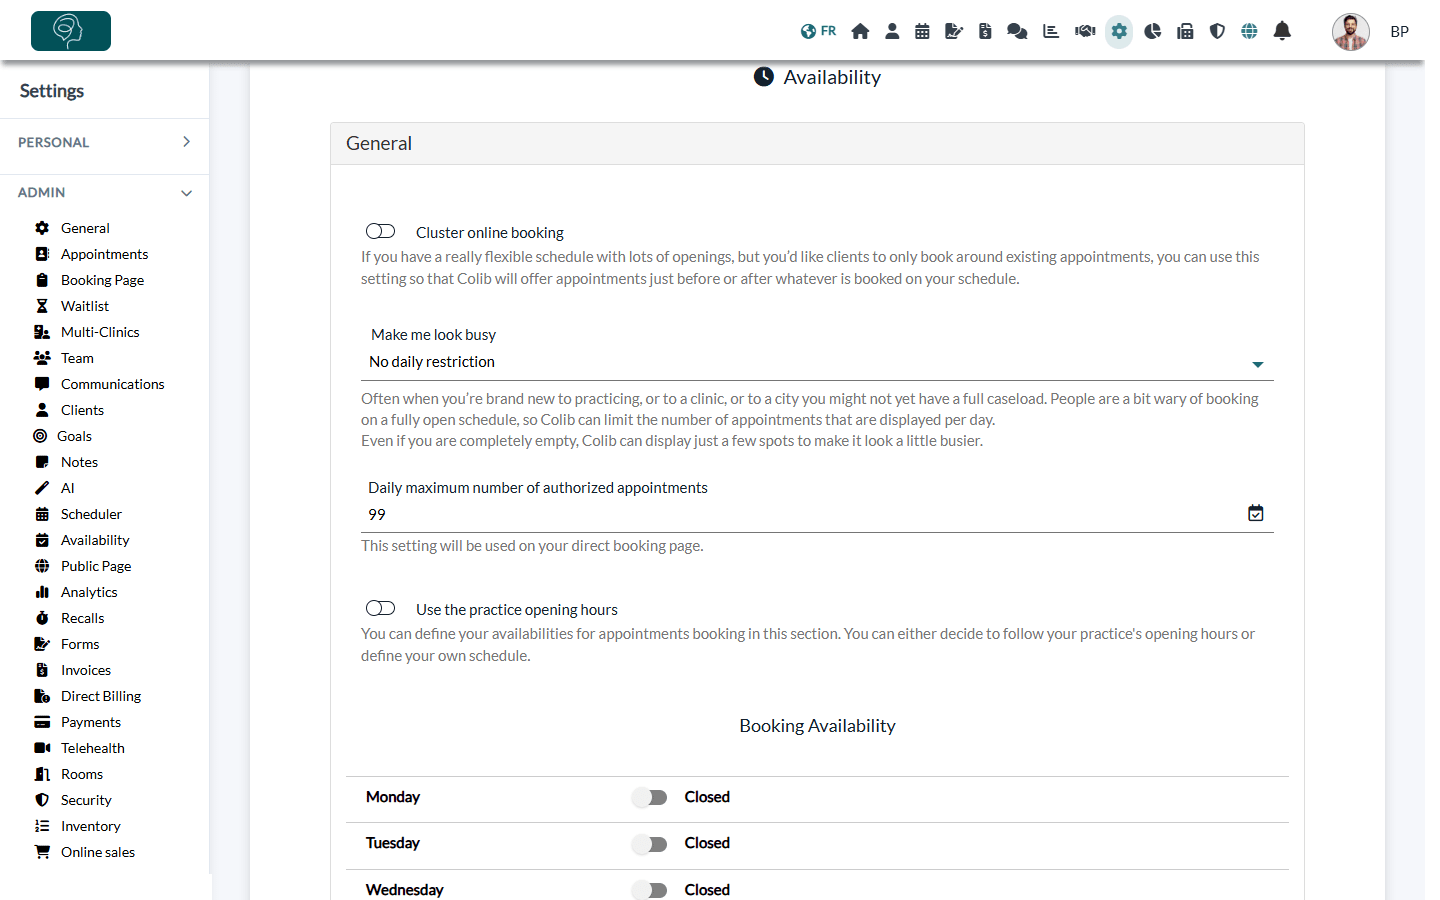
- Cluster online booking — only offer time slots just before or after the appointments already booked in the schedule.
- Make me look busy — limit the number of time slots displayed per day, so that a schedule that is still empty looks busier.
- Daily maximum number of authorized appointments — the most appointments that can be booked online in one day.
- Use the practice opening hours — follow the opening hours of the practice, or turn it off and set your own Booking Availability.
After choosing online booking, we recommend reading Why are my availabilities not showing on my scheduler or booking page? It explains every setting that decides the times offered to your clients.
See also how to update the days and hours you work, how to configure pauses and absences and how to manage your shifts.
6Share your booking page
Your booking page is ready. Open it with the here link under Page URL to test it as a client, then share it: link, QR code, website, public page. All the options are listed in the booking options offered by Colib. To share your link, its QR code, and to add your 24/7 self-booking page to your Google Business Profile or social media, please see the article titled "How to share your booking page link and QR code".
Bilingual booking page
Your booking page is made for Canada, in both languages: the same page serves your English-speaking and French-speaking clients, and each client books in the language of their choice. This section explains how the language is chosen, which texts are translated for you and which ones you write yourself, and what happens after the booking. See also the Online Booking feature page.
How clients choose English or French
- Automatically — the page opens in the language your client already chose on Colib on this device or, the first time, in the language of their web browser.
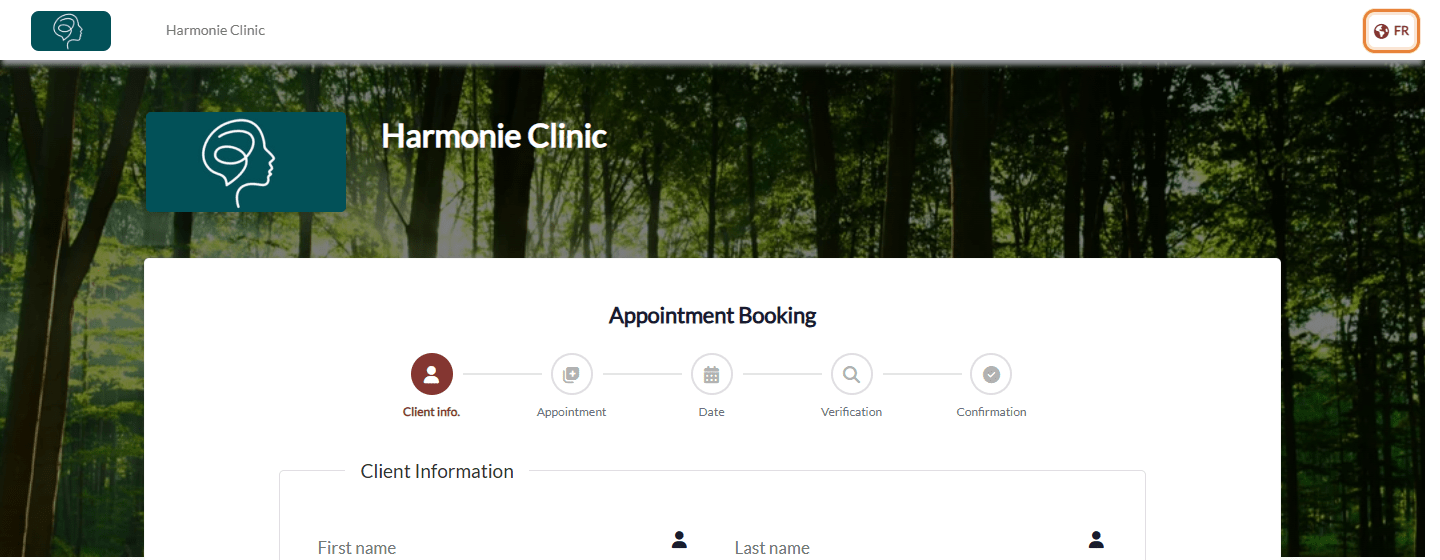
- With the language link — at the top right of the booking page, your client clicks FR to switch to French, or EN to switch to English. The page reloads in the other language, so it is best to choose before filling in the form. Colib remembers this choice on the device for the next visits.
- With a link in a given language — add /fr-ca after www.colib.io to share your page in French (for example https://www.colib.io/fr-ca/Booking/ followed by the name of your page), or /en to share it in English. Handy on a French website, in a French email signature or on a French poster.
What is translated and what you write
| Part of the booking page | Language shown to the client |
|---|---|
| Steps, buttons, fields, calendar, dates and messages of Colib | Translated automatically into the language of the page. |
| Pre-booking and post-booking texts, custom question, cancellation policy, search engine title and description | Your own texts: Colib shows the English or the French version you wrote in Settings > Booking Page (www.colib.io/settings?show=bookingpage). Please see the article titled "How do I customize the texts and SEO of my booking page?". |
| Names of your appointment types and categories | The English or French name you entered for each type and category. If you only fill in one language, it is used for both. Please see the article titled "How do I show my appointment type names in both French and English?". |
| Texts with a single field: payment information text, descriptions of categories, labels of your additional client fields... | Shown as you wrote them, whatever the language of the page. If your clients are bilingual, write them in both languages, one after the other. |
After the booking
- Language saved in the client record — when the booking creates a new client, Colib saves the language of the page in the Language field of the client record. For a client who already has a record, the language already saved does not change. You can change it at any time in the record: please see the article titled "How to edit a client's information and communication preferences".
- Confirmations and reminders in the client's language — the confirmation, the reminders and the other emails and text messages that follow are sent in the language of the client record. Your own content, written in the appointment type, is sent as you wrote it: see how to customize the emails sent to your clients before and after an appointment.
- Canadian time zones — on the date step, clients can pick their time zone and see the available times in it, and the time zone of a new client is saved in their record for their notifications (unless you turned on Block time zone during booking process): see how to manage a multi-time zone practice.
- Sales taxes — the invoices that follow the booking apply the GST, QST, HST or PST you set up, by default or according to the client's province: see how to update the default taxes for my invoices.
Good to know
- Several clinics — each clinic can have its own booking page and settings: see how to have a different booking page for each clinic.
- Cancellations by clients — whether clients can cancel online, and until when, is set in Settings > Scheduler: see how to cancel an appointment.
- Notifications sent to clients — see what notifications do clients receive after booking?.
Still have a question?
Write to us at support@colib.io, we will be happy to help.
Was this article helpful?
That’s Great!
Thank you for your feedback
Sorry! We couldn't be helpful
Thank you for your feedback
Feedback sent
We appreciate your effort and will try to fix the article